Thursday, 24 March 2011

Honey Cake

I'm going to Ellie's for dinner tonight and I said I'd bring dessert. I'm feeling rather uninspired at the moment, so it's just going to be a very simple, but hopefully tasty, honey loaf cake. The recipe is from here.

Honey Loaf Cake
Ingredients
  • 100g Butter
  • 175g Honey
  • 2 Eggs
  • 300g Plain flour
  • 2 tsp Baking powder
  • 75ml Milk
Method
  1. Cream the butter and then beat in the honey.
  2. Beat in the eggs.
  3. Sift the flour and baking powder into the mixture and fold in.
  4. Add the milk and combine gently.
  5. Pour into a greased loaf tin and bake at ~200C for ~45-55 mins until golden.
  6. Turn out onto a wire rack and brush with honey before allowing to cool.
Looking at the batter, I don't think I added quite enough milk. It's hard to tell, but the cake mix was a little on the firm side. I don't think it'll make too much difference though. Here's the cake ready for the oven.Here's the cake straight from the oven. I think it's a little dry, possibly due to not having added enough milk, but looks edible. I think it looks pretty good though.But the honey glaze just finishes it off beautifully!

Sunday, 6 March 2011

Verdict: Jewish apple cake

Put quite simply, it's a good cake. The sponge is nice and moist, a little on the dense side, but not too bad. The chunks of apple are absolutely gorgeous, slightly tart still, but with a wonderful texture. Like most apple cakes, it's screaming out for custard or ice cream - unusually, for this particular cake I think I'd go with vanilla ice cream actually. The sweetness is about right for me, which means it's probably not quite sweet enough for most people - but that'd be fixed by the ice cream I think. The cinnamon is a bit too faint in my opinion, and perhaps a tiny little bit of nutmeg would have been good, but overall it's a pretty darned good cake. It's not going to win any awards, but this cake'll go down well with anyone!

A plan comes together

Some days, everything just works out quite neatly. I found myself at a bit of a loose end today, and as often happens when that (rather unusual) occurence happens, I decided that I felt like baking something. I needed to go buy some apples too, and M&S happened to have a special offer that meant I ended up buying rather a lot more than I had initially intended to. And luckily, a couple of weeks ago, I came across a recipe for an apple cake that looked rather good - so this seemed like just the perfect opportunity! The recipe is from here, and is pretty much just anglicised and scaled down slightly...

Jewish Apple Cake
Ingredients
  • 4 Small apples
  • 2 1/2tsp Ground cinnamon
  • 4tbsp Caster sugar
  • 1tsp Lemon juice
  • 175ml Sunflower oil
  • 285g Caster sugar
  • 4tbsp Orange juice
  • 2tsp Vanilla extract
  • 200g Plain flour
  • 2 1/2 tsp Baking powder
  • 3 Eggs
Method
  1. Dice the apples into ~1cm cubes, discarding the cores.
  2. Toss the apple chunks with the cinnamon, caster sugar and lemon juice.
  3. Whisk the oil, caster sugar, orange juice and vanilla extract together.
  4. Gradually fold in the flour and baking powder.
  5. Beat the eggs and fold in gradually.
  6. Pour half the batter into a lined cake tin and cover with half of the apple chunks. Pour the remaining batter over the top and cover with the remaining apples.
  7. Bake at ~180C for ~1 hour until cooked through.
Four small apples is actually quite a bit more apple than I had thought. Here's how much I used.And the cake just ready for the oven. If only you could smell how good this smells!Here's the cake straight from the oven.What's that you say? Burned? Yup, as ever. Stupid bloody college ovens. Still looks good though!

Sunday, 13 February 2011

Verdict: Nuterocher cake

No, I didn't eat the cake I was supposed to give to Trisha - I finished and decorated one of the cupcakes in the same way to test. It was... well... frankly bad. No, actually, that's definitely far too harsh, but it certainly wasn't great. I think I've lost my touch through lack of practice - somewhere down the line, the cake went hard. I mean, really hard. I think it's a combination of the treacle and overcooking, but it was definitely hard. The cherry brandy did help soften it up a bit, and the hard bits were actually quite nice and chewy after a few bites, but it's definitely a bit of a workout for the jaw and not what I was aiming for! On the plus side though, the treacle flavour was wonderful - surprisingly powerful, given how little of it went in - and the chopped hazelnut/melted chocolate is a definite winner. The cherry brandy and treacle stop it being the Nutella/Ferrero Rocher combination I had initially intended, but the balance is actually rather good. The only real problem with the taste is that it's just a tiny little bit too sweet, but not horrendously, and I think I like my cakes to be a bit less sweet than most people anyway. It's good enough for me to give to Trisha, but not without some warning and a promise of a better cake. I think the best verdict is a mitigated failure though. I think I might bake her another one using a more standard sponge cake recipe and finishing it off in the same way - I think that would work wonderfully!

Saturday, 12 February 2011

Nuterocher cake

I decided to bake a little cake for Trisha. This also gives me an opportunity to use my newest cake tin - bought entirely on impulse because it was cheap! But I didn't feel especially inspired and was running a little low on ideas for what sort of a cake to do. It kinda had to be chocolate, I guess, but a plain ol' chocolate cake seems a tad dull. Then I thought back to where it all began, and I had an idea. So, here's what I think would happen if you were to cross Nutella with Ferrero Rocher...

Nuterocher Cake
Ingredients
  • 70g Butter
  • 70g Dark chocolate
  • 55g Plain flour
  • 1/2 tsp Baking powder
  • 70g Caster sugar
  • 70g Dark muscovado sugar
  • 1tsp Black treacle
  • 1/2 tsp Vanilla extract
  • 1 Egg
  • 25ml Cherry brandy
  • Nutella
  • More dark chocolate
  • Roast, ground hazelnuts*
Method
  1. Melt the chocolate and butter together and set aside.
  2. Mix the flour, baking powder and sugars in a large bowl and stir in the melted chocolate and butter, treacle and vanilla.
  3. Beat the egg and stir in.
  4. Pour into a well-greased and lightly cocoa dusted cake tin and bake at ~180C for ~20 minutes.
  5. Remove from tin and allow to cool on a wire rack.
  6. Slice in half horizontally and pour the cherry brandy over the inner surfaces.
  7. Spread Nutella over the lower half and replace the upper half.
  8. Melt some chocolate and pour/spread over the top of the cake.
  9. Sprinkle the chopped hazelnuts over the liquid chocolate and allow to set.
*Yes, I could have roasted and chopped them myself, but I was feeling lazy.

Ready for the oven.
But hang on a minute... that smells like burning. Oh yes, cakes rise in the oven, don't they?I think this qualifies as a baking disaster. But looking at the symptoms and having a little think about it, I realised that I'd added far too much baking powder. Baking on such a small scale is so much harder! So time for take two, in which I took a bit more care in measuring out the raising agent and also divided the batter up into the mini ring mould and three cupcake moulds. It looks rather a lot better this time. Not quite perfect, but definitely much better!
It looks quite good after decoration (at least, I think it does!).

Sunday, 23 January 2011

Bake off II

I'm back at home this weekend, and so we thought we'd have another bakeoff! It's the same rules as before, except we only used single quantities for the dough and so made pretty small loaves.
Top left was Mum's, bottom left was mine and right was Andrew's. This time around, Andrew won, but again, only just. He was helped rather a lot by his decision to form it into a plait, which made a surprising amount of difference to the texture. It was pretty too...

Tuesday, 11 January 2011

Pauper's longbrioche

My sister baked what she called millionaire's shortbread over the Christmas break, and it was absolutely fantastic. It looked a lot like millionaire's shortbread and I'm not sure what it actually was, but it wasn't actually millionaire's shortbread. For a start, the base is really a chocolate-light brownie rather than shortbread (which is probably why I liked it so much) and the caramel layer was a bit more like a fudge than a caramel. Nonetheless, it was very, very nice, and I thought I'd try baking it myself. The recipe is this one, with the hazelnuts left out.

Chocolate Caramel Bars
Ingredients
For the base
  • 200g Butter
  • 50g Cocoa powder
  • 300g Caster sugar
  • 2 Eggs
  • 225g Plain flour
For the topping
  • 125g Butter
  • 1 tin (397g) Condensed milk
  • 2tbsp Golden syrup
  • 75g Caster sugar
  • 200g Dark chocolate
  • 1tbsp Olive oil
Method
  1. Melt the butter for the base and stir in the cocoa powder and sugar for the base.
  2. Beat the eggs and stir in.
  3. Fold in the flour.
  4. Spread into a lined tin and bake at 160C/Gas Mark 3 for ~20 mins until the top is firm.
  5. Remove from the oven and allow to cool.
  6. Melt the butter for the topping and stir in the condensed milk, golden syrup and sugar for the topping.
  7. Cook on a low-medium heat, stirring continuously, for 12-15mins until dark caramel in colour.
  8. Pour over the base and allow to cool.
  9. Melt the chocolate and stir in the oil.
  10. Pour over the caramel and allow to set.
I think I should have used a bigger tin! In hindsight, my roasting tray is almost exactly the 20cmx30cm suggested in the original recipe. Oops. Here's the base batter before baking. It's rather difficult to see in the photo, but it's really quite thick - almost a paste really.After baking, it looks just like a normal brownie though.I'm not sure how much I was supposed to cook the caramel layer - I hope this is dark enough and that it sets!Anything looks pretty if you cover it with chocolate and smooth it down!

Monday, 20 December 2010

Bake off!

I'm home for the break, and we're having a whole roast suckling pig! The only trouble is, we don't have any nice fresh bread. So my brother, my mum and I had a bread bakeoff - I made up double quantities of the standard bread mixture and which we split three ways and each kneaded our own dough. We'll see who makes the best loaf!

Here are (from left to right) Andrew's loaf, mum's loaf and my loaf, ready for the oven.And now, straight from the oven (Left to right: Mine, Andrew's, mum's).They all look rather good, but that doesn't answer the big question: Who bakes the best loaf? Well, mum's was a bit denser and heavier than the other two, so that was eliminated from the running fairly quickly, but mine and Andrew's were pretty much neck and neck. I think my loaf won by a whisker - it had a slightly better, chewy texture in the middle, and the crusts were virtually indistinguishable - but it won only by the narrowest of margins. But most importantly, all three loaves were much, much better than any mass-produced loaf of bread!

Wednesday, 15 December 2010

Just another batch of cookies

I met up with Helen for dinner earlier and we decided that we weren't overwhelmed by the dessert options. So instead, I baked a batch of cookies. Same recipe as ever.

Saturday, 4 December 2010

Verdict: Lebkuchen

It's really tricky baking with the crappy college ovens. There's no real indication of the actual oven temperature and the fact that everything's half-baked and half-grilled really makes things difficult. That's my excuse anyway - the Lebkuchen were really overcooked. They should be soft, but mine mostly came out crunchy. Not bad, but not quite what I was hoping for. The taste is actually pretty good - I initially thought that the spice balance wasn't quite right, but actually the more I eat, the more I think that it's actually pretty close to the real thing. And the few which did end up soft and chewy really do taste a lot like Lebkuchen are supposed to taste. I'm undecided as to whether I prefer the iced ones or the plain ones; it does work well either way. I'm pretty pleased with this really - they're really good especially when you consider how easy they are - I'll have to try baking it again sometime when I have a better oven available!

Lebkuchen

It's getting near Christmas, and what would Christmas be without Lebkuchen? Time to get baking! This recipe is largely based on this one, but with a few minor tweaks here and there (chiefly, I've replaced the cardamom with nutmeg and also made a few other changes to make the ingredients easier to obtain in the UK).

Lebkuchen
Ingredients
  • 4 Eggs
  • 200g Sugar
  • 1tsp Vanilla extract
  • 1tsp Lemon juice
  • 1 1/2tsp Cinnamon
  • 1tsp Cloves
  • 1tsp Allspice
  • 1/2 tsp Nutmeg
  • 200g Ground almonds
  • 125g Mixed peel
  • 250g Plain flour
  • 2tsp Baking powder
Method
  1. Beat the eggs, sugar and vanilla extract together.
  2. Add all the remaining ingredients, combining to form a dough.
  3. Shape into portions roughly 10mm thick and bake at ~180C for 15-20 mins.
  4. Allow to cool. Cover with melted chocolate, icing or icing sugar if desired.
Sounds simple, doesn't it? Well, as it turns out, it is mostly - the hardest part is shaping the dough into biscuits for baking, as it's so sticky. Here's the dough.
After a bit of struggling with the stickiness, eventually it looks like this when ready for the oven. I was expecting them to merge into one giant Lebkuchen.And straight from the oven. They didn't spread out very much in the end!I iced some of them with a plain icing. I think they look pretty good overall!

Friday, 19 November 2010

Marbles...

I'm off kayaking this weekend, and I thought I'd try to ingratiate myself in advance to the people who will probably end up spending large chunks of their weekend pulling me out of the river. And what better way than by baking cake? It's got to be quick and easy though, so I've gone for a marble cake, taking the recipe out of The Baker.

Marble Cake
Ingredients
  • 185g Butter
  • 230g Caster sugar
  • 3 Eggs
  • 1tsp Vanilla extract
  • 280g Plain flour
  • 3tsp Baking powder
  • 185ml Milk
  • 2tbsp Cocoa powder
Method
  1. Cream the butter and sugar together.
  2. Beat in the eggs and vanilla extract.
  3. Fold in the flour, baking powder and milk, alternating additions of dry ingredients with the milk.
  4. Divide the batter in two. Beat the cocoa powder in a bowl with a little milk to form a paste and add to half of the batter, combining thoroughly.
  5. Spoon the batter into a greased 1lb loaf tin, alternating spoonfuls of light and dark batter.
  6. Draw a skewer through the batter a few times to create the marbling.
  7. Bake at 180C for 40-60 minutes until cooked through.
Here's the cake in the tin (end of step 5).
And after marbling (end of step 6).
It came out of the oven slightly compressed, as I'd covered it with foil and baking paper in an effort to stop the stupid college oven grilling the top. It sort of worked - at least it's not burnt to a cinder on top!
It looks rather better when turned out of the tin though. The photo looks a bit more anaemic than the cake does in real life.
The marbling didn't work though. One day, I'll get it right, but today was not that day.I also baked a (half-quantities) flapjack to bring with me too. Slightly overcooked it, and then forgot that you have to let flapjacks cool in the tin before removing, or they disintegrate. Oops.


Sunday, 14 November 2010

Verdict: Yes! We have n̶o̶ bananas!

Well, I've tried one of the cupcakes now. The flavours aren't as coherent as they were in my head, so it's a slightly strange mish-mash of tastes. But it's pretty decent overall - I'm not convinced by the chocolate chips though; I don't really know if they go that well with the rest of the cake. But the sweetened mascarpone works wonderfully and the texture is absolutely wonderful. It's mostly a good recipe I think, but needs a bit of tweaking - perhaps just going down the plain banana bread cupcake route is the way forward.

Saturday, 13 November 2010

Frank Silver and Irving Cohn lied!

I owe Rob a cake. I bribed him a few weeks ago with the promise of cake, so it's time to make good on my promise!

Yes! We Have No Bananas!
Ingredients
For the cake
  • 4 Very ripe bananas (~350g peeled weight)
  • 310g Honey
  • 2 Eggs
  • 3tbsp Olive oil
  • 3tbsp Milk
  • 78g Self-raising flour*
  • 130g Plain flour*
  • 80g Strong bread flour*
  • 3tsp Bicarbonate of soda**
  • ~1/4 Nutmeg (just over a gram)
  • 110g Chocolate chips
For the filling/decoration
  • 250g Mascarpone
  • 35g Honey
  • Dried banana chips
Method
  1. Mash the bananas with the honey.
  2. Whisk in the eggs, oil and milk.
  3. Fold in the flour, baking powder and nutmeg.
  4. Fold in the chocolate chips.
  5. Divide the mixture between a greased 1lb loaf tin and 5 cupcake cases and bake at ~180C for ~15mins (cupcakes) or ~30mins (loaf tin) until cooked through.
  6. Turn out onto a wire rack to cool.
  7. Cream the mascarpone and honey together.
  8. Cut the loaf cake in half horizontally.
  9. Sandwich the loaf cake with the mascarpone/honey mixture and spread the rest on the top of the cupcakes.
  10. Embed banana chips in the top of the cakes.
*Yes, I ran out of flour. How did you guess?
**Honey is slightly acidic, so no cream of tartar should be necessary. I think...

Here's the mixture at the end of step 1. As you can see, there are still quite a few lumps of banana - I should have mashed the bananas on their own first and then added honey afterwards. Well, hindsight is 20/20 and all that.Ready for the oven - check out my new cupcake moulds!The cupcakes out of the oven. They're slightly overcooked, and one has an elephant man thing going on, which will need amputation at some point. But they look like cupcakes at least!
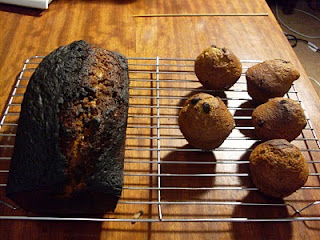
Here's the loaf cake out of the oven and finally cooked through. It's a bit... what's the word? Oh yes, BURNT TO HELL! I've now discovered that the stupid crappy college-provided oven has the heating element on the top of the oven - so when you bake things, they also grill simultaneously. A complete pain for baking cakes! Oh well, I'll just have to hack the top off.But at least it released from the tin nicely. :o)The finished article.

Saturday, 16 October 2010

Verdict: Red velvet cupcakes

In my opinion, they were slightly disappointing. They were reasonably good, but ultimately pretty boring. They don't taste of much, and although they are quite nice and moist... they don't taste of much. And I still don't really like icing, although this particular icing was much better than the regular sugar-and-water types. All in all, it's a success, but I really don't understand why this cake has such an incredible reputation. Give me an Elizabeth David chocolate cake any day...

Red velvet

There are few cakes whose reputation really precedes them. One is the Elizabeth David cake, whose reputation is entirely justified. Another is a very American recipe - the Red Velvet cake. I think it's time for me to try this one out, and to give it the best chance possible, the recipe I'm using is out of the Magnolia Bakery cookbook. I've decided to bake it as a batch of cupcakes though and the buttercream isn't actually what's suggested as icing, but the creamy vanilla frosting that they actually suggest looks like way too much hassle.

Red Velvet Cupcakes
Ingredients
For the cupcakes
  • 170g Butter
  • 430g Caster sugar
  • 3 Eggs
  • 76ml (two bottles) Red food colouring
  • 3tbsp Cocoa powder
  • 1 1/2 tbsp Vanilla extract
  • 355ml Buttermilk
  • 330g Plain flour
  • 1 1/2 tsp Cider vinegar
  • 1 1/2 tsp Bicarbonate of soda
For the buttercream
  • 115g Butter
  • 390g-500g Icing sugar
  • 60ml Milk
  • 1tsp Vanilla extract
Method
  1. Cream the butter and sugar until fluffy.
  2. Beat in the eggs.
  3. Whisk in the food colouring, cocoa and vanilla extract.
  4. Fold in the buttermilk and flour a little at a time, alternating buttermilk and flour.
  5. Mix in the vinegar and bicarbonate of soda.
  6. Pour into cupcake moulds and bake for ~20mins at ~180C/Gas mark 3.
  7. Remove to a wire rack to cool.
  8. For the buttercream: Cream the butter, 260g of the icing sugar, the milk and the vanilla extract together.
  9. Gradually add the remaining sugar, beating after each addition, until the buttercream is thick enough to be of good spreading consistency.
  10. Spread or pipe buttercream on top of cooled cupcakes.
It turns out that this makes quite a lot of batter, so some of it had to be baked in a loose-bottomed tin as a regular cake.
Here's my glamourous assistant, Veronica.
The finished cake batter. Just look at that colour!
How much it made - twelve small cupcakes and about a sandwich tin's worth of batter.The cupcakes were a bit burnt on the top, but actually it's not as bad as it looks by a long shot. Even the most badly burnt bits were very edible.But just look at how pretty the cupcakes were when turned out!Me looking somewhat gormless while checking on the big cake.The cupcakes removed from the trays.The big cake.After icing. I think they look pretty good!