Saturday 24 October 2015

Verdict: Cinnamon rolls

In a word: Amazing. They say that the best seasoning is "hunger". After tasting these,  I'm starting to think that maybe butter and sugar might just give hunger a run for its money.

To give you an idea of quite how amazing these are, I had originally intended to take a photo partway through one of the rolls so that you could see the inside of it - but I just couldn't stop eating it, and devoured it instead. They're everything a cinnamon roll should be. Buttery, soft, buttery, sweet, buttery, a little gooey... did I mention buttery? Oh so good, but I've just eaten two in quick succession and they're so rich that I couldn't eat another. At least not quite yet. They're not in the slightest boozy (which makes me wonder if I might have been better off plumping the sultanas up in juice, rather than gin), and not nearly as sickly sweet as most cinnamon rolls are. The inner sections are, unsurprisingly, definitely better than the ends. Less obviously, the inside edges of the block are also better than the exposed edges - I had expected the edges to do some lovely caramelisation magic, but really you get that on the top of every roll, and the outer edges are just a bit drier rather than the wonderfully soft inners.

We'll have to wait and see how they are once they've cooled down, but straight from the oven, these are absolutely magical. Well worth the wait!

Update: Obviously, they're not as good when they've cooled, but they're still pretty darned good. I suspect they'll reheat passably in the oven, though I'm usually too lazy to bother...

Update 2: 20 seconds in the microwave reheats them beautifully!

Everyone loves cinnamon

At least I think everyone does, don't they? But more importantly, I like cinnamon. For quite a while now, I've been thinking about trying to bake cinnamon rolls. They're so wonderfully indulgent, usually a little too sweet and always obviously-unhealthy-in-the-tastiest-possible-way. Well, now that I've got a decent oven, there's no time like the present! After reading through rather a lot of variations on the theme, my recipe is cribbed from this one, but with the usual fiddling around the edges. I don't actually know if that recipe is a good starting point or not, but I think it looks pretty solid.

Cinnamon Rolls
Ingredients
For the dough
  • 450g Strong white flour
  • 1tsp Salt
  • 50g Caster sugar
  • 1 sachet (7g) Fast action dried yeast
  • 75g Butter
  • 220g Milk
  • 1 Egg
For the filling
  • 150g Sultanas
  • 150g Gin
  • 100g Butter
  • 100g Caster sugar
  • 3tsp (~5g) Ground cinnamon
  • 1 Egg
For the glaze
  • 50g Caster sugar
Method
  1. Pour the gin over the sultanas and allow to soak.*
  2. Mix the flour, salt, sugar (for the dough) and yeast together in a mixing bowl.
  3. Rub in the butter (for the dough).**
  4. Make a well in the centre of the mixture and pour in the milk and egg (for the dough). Mix gently to form a dough.
  5. Turn the dough out onto a clean surface and knead until smooth and elastic.
  6. Place dough into a greased bowl, cover with a damp teatowel and leave to rise for ~90mins.
  7. In another mixing bowl, beat the butter (for the filling) with the sugar (for the filling) and cinnamon until well combined into a paste.
  8. Once the dough is done rising, knock the air out of it, tip onto a clean surface and spread out into a rectangle between A4 and A3 in size, a few millimetres thick (the original recipe suggested aiming for the thickness of a one pound coin).
  9. Spread the cinnamon/sugar/butter paste over the entire rectangle, covering it right to the edges.
  10. Drain the sultanas (setting aside the gin) and sprinkle evenly across the dough.
  11. Roll the dough up in the direction of the short side, then cut into 12 even pieces.
  12. Lie the slices down (cut sides down) in a lined roasting tin, cover with a damp teatowel and leave to prove for ~45mins.
  13. Beat the remaining egg and brush the tops of the rolls.
  14. Bake at 200C for ~10 mins, then turn oven down to 180C and bake for a further 20 mins.
  15. Heat the gin drained from the sultanas with the sugar (for the glaze) in a saucepan, stirring until dissolved. Simmer gently and reduce down to a few tablespoons of volume.
  16. Brush the syrup over the rolls as soon as they come out of the oven, then transfer them on to a wire rack to cool.
*Rum would have been more conventional (and probably would have worked better) but I didn't have any rum in stock, so I used gin instead. I used Tanqueray, but I don't think it would make a huge difference if I'd used any of the other gins from my cupboard. In hindsight though, I should have used kirsch or cherry brandy instead of gin, both of which I did have on my shelf.
**I actually managed to forget to do this step, and so had to rub the butter in together with the milk and egg. I don't think it will make any significant difference, but it was certainly less easy than it would have been if I'd not been so absent-minded!

This has certainly not been a fast recipe to make - I started baking at around 2:30pm this afternoon, and they eventually went into the oven just after 7pm! But it's been a lot of fun, and watching the two rising processes has been so satisfying!

Here's the cinnamon/sugar butter paste. It doesn't look all that appetising at this point, I must admit. Also, you probably want to use a bigger bowl for this than I did...

I'd forgotten how easy leavened doughs can be if you use white flour and packaged yeast! Look how well the first rise went!

As you can see, I'm not very good at rolling stuff out into neat rectangles.

Now just try to tell me that that doesn't look good!

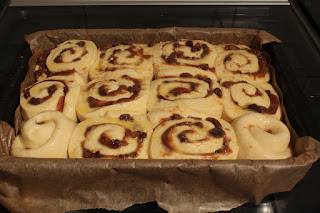
Ready for the prove. I'm expecting (and hoping) that these will rise and expand and stick together slightly to form one large tasty gooey mass!

Wow, don't those look good? They've proved so well and squidged together just as I'd hoped. Here they are ready for the oven after a quick egg wash.

I've just turned the oven down, and I can't quite get a photo that does justice to how good they look! I'm a little concerned by how brown the top has got already, but I'm hoping that it'll still turn out nicely anyway.

This is how much I reduced the glaze down to.

Fresh from the oven, they look even better than I'd hoped!

And better still after being glazed.


Just look at the insides!

Sunday 11 October 2015

A proper test

We may have christened the oven with the ginger treacle biscuits, but it's time to give it a proper test. How do we do that? Well, how else but baking some bread. It's been a long, looooong time since I've made any bread, and Aage's been getting bored. So no time like the present! I made up a standard batch of wholemeal sourdough bread dough (500g wholemeal flour, 300g water, 10g salt, ~10g olive oil, half of Aage) and then split it into two so that Fiona could knead one and I could knead one.

Ready for the oven - mine's the one on the left, Fiona's is the one on the right.

Fiona's getting excited! (And a little impatient too...)

Don't they look gorgeous?


All in all, a success! The oven performed beautifully, and I can still remember how to bake bread. And Aage was as brilliant as ever too :o).

Thursday 8 October 2015

Time for a christening!

I got a new oven installed on Monday, and it's a shiny thing of much shininess. Naturally, it needs to be christened! I stumbled across this recipe the other day, and it really caught my eye, so I thought I'd try doing a version of it.

Soft Ginger Treacle Biscuits
Ingredients
  • 175g Butter
  • 150g Soft dark brown sugar
  • 2 Eggs
  • 125g Black treacle
  • 2tsp Vanilla extract
  • 375g Plain flour
  • 3tsp Baking powder
  • 4tsp Ground ginger
  • 1tsp Ground cloves
  • 1tsp Ground nutmeg
  • Pinch of salt
  • Caster sugar for coating
Method
  1. Cream the butter and sugar together.
  2. Beat in the eggs, then stir in the treacle and vanilla.
  3. Stir in the flour, baking powder, spices and salt to form a mixture/soft dough.
  4. Roll mixture into 2-3cm diameter balls and roll in caster sugar.
  5. Bake at 180C for 10 minutes, then cool on a wire rack.
Here's my shiny new oven. Check out how shiny it is!


Here's the "dough" ready to be shaped.

This is only the first batch of biscuits, ready for the oven. It's about half the overall yield.


Oooooooh!

Aren't they pretty?


They look gorgeous, no?

So what were they like? Pretty good really. Straight from the oven, while they were still warm, they were beautifully soft. When they cool, they develop a lovely little crunch around the edges, with a soft centre - although the centre did start to feel a little drier when cold. The treacle lent them a lovely taste, which went nicely with the ginger and other spices. Unfortunately, this batch ended up over-salted (I think I may have accidentally used salted butter, which I don't usually buy), which made them taste a little strange, but not unpleasantly so. Fiona certainly seemed to like them though! I'll have to bring them into the lab tomorrow and see what the other post-docs think...

Sunday 20 September 2015

With a cherry on top

Fiona and I have been intending to bake something together for aaaaaages, and we finally got around to it! I had a couple of jars of morello cherries from Lidl in my cupboard, so we decided to do a cherry tart. Nothing terribly outlandish or high effort, but it was still fun and tasty. I only had my tablet to take photos with though, so apologies for the poor quality photos.

Simple Cherry Tart
Ingredients
For the filling
  • One jar of morello cherries in syrup (350g drained weight)
  • 3tbsp Caster sugar
  • Approx 1/4 of a nutmeg*
  • A generous shake of ground cinnamon*
  • 2tbsp Plain flour
For the shortcrust pastry
  • 200g Plain flour
  • 100g Butter
  • 50g Sugar
  • Few tablespoons of the syrup from the jar of cherries*
Method
  1. Drain the cherries, keeping the syrup, and put in a saucepan.
  2. Mash the cherries, add the rest of the ingredients for the filling and simmer.
  3. Rub the butter into the flour and sugar for the pastry until it resembles breadcrumbs.
  4. Add a little syrup from the cherry jar to turn it into a dough.
  5. Roll out two-thirds of the pastry and line two greased pie dishes.
  6. Weigh down and blind bake for ~15 minutes at ~200C.
  7. Pour filling into pie dishes and decorate with remaining pastry.
  8. Bake for ~15 minutes at ~200C.
*As you can see, we might have been winging it slightly with the recipe...

Here's my glamorous assistant (who is actually the one doing all the work).

And here she is, still doing the work.

The finished articles!

So how was it? Well, really rather good. The filling was a bit thin (as was the pastry), but this actually worked quite nicely - the filling would have been a bit too sharp otherwise, but it was quite nicely balanced with the sweeter pastry as it was. We slightly overbaked the pie crusts when blind baking it, which meant the lattice had to be a little under done to stop the crust from burning, but it was generally really rather tasty. Nothing overly special, but nice to see that even really low effort pies can still taste so good!

Thursday 26 March 2015

Trev's retirement

Well, that was another rather long, unplanned hiatus. This is probably a one-off too, so expect another sizable delay until the next update! Having worked at Osney for 39 years now, Trev is officially retiring tomorrow, and Doc has coerced persuaded all the post-docs to contribute some form of dessert to the celebrations. I thought it would be nice to do something a little different, so I'm doing a triple-quantities batch of bacon cookies, but without walnuts again.

This time around, I decided to fry the bacon off in its own fat. It needed an additional chunk of butter to kickstart the frying process still. Can you feel the artery-hardening tastiness yet?
 Wow, that's a lot of bacon. It's an entire pack (10 rashers).
The sensible thing to do would have been to fry it off in small batches. Obviously, I'm far too lazy to do that...
Getting there - this took rather a lot longer to drive off the moisture than I expected. See how much it cooks down though!
And there we are!
No way I was going to let all this goodness go to waste. This got deglazed with water and reduced down to about 2tbsp of liquid, which got added to the batter along with the honey and vanilla.
Part of the first batch ready for the oven. Obviously this will all stick together, but I don't have enough baking trays to let me space them out more without needing a million batches.
They look good, don't they? I just hope that people like them, otherwise I'm going to be left with a heck of a lot of leftovers!