Thursday, 31 December 2009
Verdict: Spiced honey cake
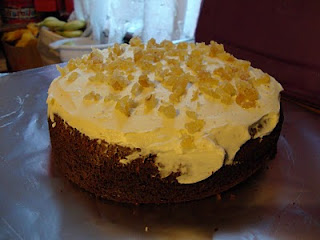
The eagle-eyed amongst you may be wondering why there's a verdict for a cake I baked for Alan. Well, it turns out that I'm a muppet - I forgot to bring the cake with me. Anyway, I'm seeing him in about two weeks' time anyway, so I'll bake him another one. Aaaaannnyway, how was the cake itself? Slightly dense - I think too much liquid and possibly not enough baking powder. The spice was quite subtle; fairly nice, but definitely subtle. Perhaps a bit more would be better. The honey flavour did come through though, which lent the cake a lovely depth. I think it's a pretty good success!
Tuesday, 29 December 2009
Spiced honey cake
It was Alan's birthday at the end of November. It's been rather a while since I last saw him, but we're going for dinner tomorrow evening so I thought I'd bake him a birthday cake. So here it is! It's just a variation on a standard sponge, but I think it could work quite well.
Spiced Honey Cake
Ingredients
For the cake:
Spiced Honey Cake
Ingredients
For the cake:
- 220g Butter
- 350g Honey
- 4 Eggs
- 1tsp Vanilla extract
- 220g Plain flour
- 3tsp Baking powder
- 1tsp Cinnamon
- 1tsp Nutmeg
- 1tsp Allspice
- 3tsp Ground ginger
- 250g Mascarpone
- 3tbsp Honey
- ~50g Crystallised ginger.
- Mash the butter and honey for the cake together.
- Beat in the eggs and vanilla.
- Fold in the dry ingredients.
- Pour into a greased cake tin and bake at 180C for 40-50 mins.
- Turn out onto a wire rack and allow to cool.
- Cream the mascarpone and honey for the topping together.
- Spread over the top of the cake.
- Chop the crystallised ginger and sprinkle over the top.

Monday, 21 December 2009
Verdict: Chocolate ganache cake
Oops, I forgot to post this yesterday. Anyway, the cake: Pretty good actually. I think it wasn't quite cooked all the way through, but it was pretty borderline and certainly not unpleasantly raw. My thought was slightly rubbery in the centre, but others went with "fudgy" instead. The chocolate ganache was oilier than I'm used to with the addition of butter, so I think it really needs to be served cold rather than at room temperature - with the ganache slightly more solid, I thought it was much nicer. But overall, it really was rather good. Obscenely rich and fattening, but I guess lots of people will say that's a good thing! A good cake for chocolate lovers.
Friday, 18 December 2009
Mmmm... Chocolate!
I'm off to visit Anita this weekend. As you might understand, I'm pretty happy about this fact. And I figured, no one ever complains about chocolate cake. So I thought I'd bake one to bring with me. I also owe Helen a cake as compensation for accidentally insulting her rather badly one time we met recently. I forget what it was that I said, but it was sufficiently bad that, unintentional or not, it could only be made better by chocolate cake. As a result, there's quite a lot riding on this, so it'd better be a good one. So naturally, I went to Rouxbe for the answer.
Chocolate Ganache Cake
Ingredients
For the cake
Anyway, I bet you're expecting photos now. Well, I hate to disappoint, so...
Here are the two sandwich tins after about five minutes in the oven. Looking good so far!
 Here it is after my nerve failed me and I didn't dare bake it any longer. I suspect the very centre may still be undercooked, but I really didn't want to burn the top (any more than it had already burned!).
 And they came out of the tin! With a little coercion, but they came out!
 Nearly finished! I've always taken the opinion that it doesn't matter what a cake looks like, as long as it tastes good. While I'm gradually coming around to the idea that this might not be entirely true, it still means that I've never really learned how to decorate a cake well - hence the rather messy cake and even messier surroundings. Oh well.
 And the final cake. Once the ganache had mostly set, I was finally able to spread the sides with it.
 Here's the finished single-layer cake for Helen. Looks pretty good I'd say! As you can see by the glossy surface, this photo was taken before the ganache set.
Chocolate Ganache Cake
Ingredients
For the cake
- 220g Plain flour
- 430g Caster sugar
- 2 1/2tsp Baking powder
- 95g Cocoa powder
- 3 Eggs
- 150ml Light olive oil
- 300ml Milk
- 300ml Strong coffee
- 550g Plain chocolate
- 300ml Double cream
- 210g Butter
- Sift all of the dry ingredients for the cake into a mixing bowl.
- Whisk all of the wet ingredients for the cake separately, then pour into the dry ingredients and whisk together.
- Pour into greased sandwich tins and bake at 180C for 40-45 minutes, testing with a skewer.
- Turn out onto a rack and allow to cool completely.
- Scald the cream and pour over the chocolate and butter. Stir until all melted and combined.
- Spread the ganache over one cake. Stack the second cake on top and cover the top and sides of the double-layer cake.
Anyway, I bet you're expecting photos now. Well, I hate to disappoint, so...
Here are the two sandwich tins after about five minutes in the oven. Looking good so far!
 Here it is after my nerve failed me and I didn't dare bake it any longer. I suspect the very centre may still be undercooked, but I really didn't want to burn the top (any more than it had already burned!).
 And they came out of the tin! With a little coercion, but they came out!
 Nearly finished! I've always taken the opinion that it doesn't matter what a cake looks like, as long as it tastes good. While I'm gradually coming around to the idea that this might not be entirely true, it still means that I've never really learned how to decorate a cake well - hence the rather messy cake and even messier surroundings. Oh well.
 And the final cake. Once the ganache had mostly set, I was finally able to spread the sides with it.
 Here's the finished single-layer cake for Helen. Looks pretty good I'd say! As you can see by the glossy surface, this photo was taken before the ganache set.
Sunday, 13 December 2009
Verdict: Marzipan Stollen and sour cherry and marzipan tart
Lovely. The Stollen was definitely Stollen, though it was slightly dry. But it tasted good, was as light as it should have been and the marzipan layer added just enough sweetness and moistness to prevent it being boring. A definite success there. The sour cherry and marzipan tart was also really nice - the tartness of the cherries was balanced really well by the sweetness of the marzipan and the flavours go together so well too. The crème fraîche mixture didn't really add very much as far as taste goes, but it kept the whole tart nice and moist and helped offset the buttery pastry. This recipe works really well!

Saturday, 12 December 2009
A taste of Christmas
Valerie and James are hosting a Christmas party tonight, and they've asked everyone to bring something to contribute food-wise. I thought it'd be a perfect opportunity to try making Stollen - a leavened Christmas cake from Germany, and something I love. This is certainly not a traditional Stollen, but hopefully it'll be recognisable as Stollen! I also think that cherry and almond, while a winning combination at all times, also seems quite Christmassy. I'm also always on the lookout for cakes and tarts that are more interesting than the ones I normally bake, and when I came across this recipe, I thought I had to give it a go. So I'm baking two things to bring along with me!
Marzipan Stollen
Ingredients
Sour Cherry and Marzipan Tart
Ingredients
For the pastry
 And here it is again after rising (end of step 5). It's impossible to tell, (I should have put something in the photos for scale), but it's risen quite significantly. You'll just have to take my word on that one.
 After kneading in the fruit/nut mixture and flattening (end of step 8). I did have to add quite a bit of flour to keep the Stollen to a doughy consistency as the fruit/nut mix was so moist. It may not be an authentic Stollen, but I tell you, that fruit and nut mixture really smells of Christmas!
 Add the marzipan (end of step 9).
 Ready for proving (end of step 10).
 And here it is again about to go into the oven. See, it really did rise!
 Straight out of the oven (end of step 12). It's a bit darker than I really had intended, but then I've still not got used to having a fan oven yet. But it's looking rather good!
 With the butter glaze now absorbed (end of step 13).
 And finished!

 Now for the tart. Isn't this the prettiest looking (unbaked) tart case you ever saw? If you're wondering about the santoku knife in the picture, it's not completely random. It's what I used to trim off the excess pastry. I had to add a heck of a lot more flour to make this pastry dough incidentally - I think I must have added too much milk to start with.
 But disaster! After blind baking, the pastry shrank so much, there are no sides to the tart case! The base also rose significantly - maybe I shouldn't have been lazy and not weighed it down with baking beans.
 The solution - baking parchment!
 And the assembled tart ready for the oven.
 The finished product! I'm quite pleased with it actually - I was expecting this to be a horrible messy failure after the disappearance of the walls of the case. This actually looks pretty good to me. But, as they say, the proof of the pudding is in the taste and for news of that, you'll just have to wait, won't you?
Marzipan Stollen
Ingredients
- 100ml Kirsch
- 1tbsp Brown sugar
- 75g Sultanas
- 50g Mixed peel
- 50g Butter
- 250g Plain flour
- 1 Sachet fast action dried yeast (approx. 7g)
- 115ml Milk
- 20g Caster sugar
- 1 Egg, beaten
- 35g Glacé cherries, chopped
- 1/2tsp Ground cinnamon
- 1/2tsp Ground nutmeg
- 1tsp Vanilla extract
- 50g Flaked almonds
- 1tbsp Cherry brandy
- 100g Marzipan
- Melted butter for glaze
- Icing sugar for dusting
- Dissolve the brown sugar in the kirsch.
- Soak the sultanas and mixed peel in the kirsch overnight.
- Sift the flour into a bowl. Melt the butter and stir in with the yeast, milk, caster sugar and beaten egg.
- Knead until the dough is soft, elastic and not too sticky.
- Place in a floured bowl, cover with a damp tea towel (or oiled cling film) and leave to rise for 1 hour.
- Drain the sultanas and mixed peel from the kirsch and mix with the cherries, cinnamon, nutmeg, vanilla, almonds and cherry brandy.
- Knead the fruit mixture into the dough.
- Turn out onto a floured work surface and flatten into a rectangle approx 20cm x 15 cm.
- Break up the marzipan into pieces and scatter over the dough.
- Roll loosely lengthways and transfer to a floured baking sheet.
- Cover with a damp tea towel and leave to prove for ~1hr30mins.
- Bake at 180C for 35-40 minutes until pale golden.
- While still hot, brush with melted butter and allow to cool fully so the butter is absorbed.
- Sift icing sugar over the cooled Stollen.
Sour Cherry and Marzipan Tart
Ingredients
For the pastry
- 175g Plain flour
- 3tbsp Caster sugar
- 125g Butter
- 1 Egg
- 150g Marzipan
- 350g Drained sour cherries
- 3 Eggs
- 200g Crème fraîche
- 2tbsp Caster sugar
- 1tsp Vanilla extract
- 50g Flaked almonds
- Rub the flour, sugar for the pastry and butter together until the mixture resembles coarse breadcrumbs.
- Add the egg and combine to form a pastry. Roll it out and line a flan ring.
- Refrigerate for 30 minutes to rest the pastry.
- Bake the tart case blind at 200C for 15 minutes.
- Crumble the marzipan over the base of the tart case. Place the cherries on top.
- Whisk the crème fraîche, sugar for the filling, eggs and vanilla extract together and pour over the cherries.
- Sprinkle with the flaked almonds.
- Bake at 200C for 25-30 minutes until the pastry is cooked and the almonds are a light golden brown.
- Allow to cool on a wire rack.
 And here it is again after rising (end of step 5). It's impossible to tell, (I should have put something in the photos for scale), but it's risen quite significantly. You'll just have to take my word on that one.
 After kneading in the fruit/nut mixture and flattening (end of step 8). I did have to add quite a bit of flour to keep the Stollen to a doughy consistency as the fruit/nut mix was so moist. It may not be an authentic Stollen, but I tell you, that fruit and nut mixture really smells of Christmas!
 Add the marzipan (end of step 9).
 Ready for proving (end of step 10).
 And here it is again about to go into the oven. See, it really did rise!
 Straight out of the oven (end of step 12). It's a bit darker than I really had intended, but then I've still not got used to having a fan oven yet. But it's looking rather good!
 With the butter glaze now absorbed (end of step 13).
 And finished!
 Now for the tart. Isn't this the prettiest looking (unbaked) tart case you ever saw? If you're wondering about the santoku knife in the picture, it's not completely random. It's what I used to trim off the excess pastry. I had to add a heck of a lot more flour to make this pastry dough incidentally - I think I must have added too much milk to start with.
 But disaster! After blind baking, the pastry shrank so much, there are no sides to the tart case! The base also rose significantly - maybe I shouldn't have been lazy and not weighed it down with baking beans.
 The solution - baking parchment!
 And the assembled tart ready for the oven.
 The finished product! I'm quite pleased with it actually - I was expecting this to be a horrible messy failure after the disappearance of the walls of the case. This actually looks pretty good to me. But, as they say, the proof of the pudding is in the taste and for news of that, you'll just have to wait, won't you?
Sunday, 6 December 2009
Verdict: Dessert party
Well, the dessert party was a success I'd say. A lot of fun, though in retrospect, some savoury additions would probably have been a good idea. Helen suggested some savoury crackers for in between desserts, which I think would be an excellent idea. Anyway, the desserts: The pavlova was like any other pavlova - too sweet, tasteless and boring. At least that's what I thought. But everyone else seemed to like it. I think meringues just aren't my thing. But the cherry gel worked really nicely with it. Next up was the chocolate fudge tart, which I thought was a bit too sweet. Again, no one agreed, but it was definitely good - not too rich, sweet or chocolatey, but quite a nice subtle tart. Kenny said it was his favourite of all of them, and I can see why, though it was more solid and less fudgy than I'd been hoping for. I think the orange sauce really helped though. The Black Forest Gateau was absolutely beautiful and, much to my satisfaction, received many Ooohs and Aaahs when I brought it out. The sponge was a little dense (it did suffer from me knocking out air from the egg whites I think) and could have done with kirsch in the middle layer, but it was most definitely a Black Forest Gateau and I was really rather pleased with it, despite its faults! The waterchestnut cake was wonderful (I thought), but as expected somewhat polarised the others - some liked it, others hated it. It's texture is a bit like quite a firm jelly, but with the bits of waterchestnut distributed all the way through. Mainly, I served it to let people try it - I figured it would be unlike anything anyone would have had before. The tiramisu was the final dish and was lovely. I think, though, it wasn't as good as usual - I think the wine takes too much away from the sweetness, so I think I will leave it out in future even if I have wine to hand. But anyway, I really enjoyed the evening and I think most of the others did too!


Saturday, 5 December 2009
Final preparations
Only a few hours to go, so it's time to finish off the last few desserts for the party. The last one I had originally planned was to be a chocolate fudge tart, served with an orange sauce. But seeing as I've got 6 egg whites left over from the tiramisu and a rather a lot of the cherry gel from the Black Forest Gateau, doing a pavlova seemed an obvious addition too.
Pavlova
Ingredients
 And straight out of it. The cracks are from me being somewhat ham-fisted when removing the teflon baking liner.
 I also reduced the remaining cherry gel down to about half its original volume and added a generous slug of cherry brandy. I'll serve the pavlova with this sauce and the remaining whipped cream.
Chocolate Fudge Tart with an Orange Sauce
Ingredients
For the case
 And the completed flan ready for the oven.
 And straight from the oven. It's slightly burnt, but not horrendously so...
 Right, bring on the party!
Pavlova
Ingredients
- 6 Egg whites
- 340g Caster sugar
- 1 tsp Cornflour
- 1 tsp Lemon juice
- 1 tsp Vanila extract
- Whisk the egg whites until stiff.
- Gradually the sugar and beat until a spoon can be stood in the mixture.
- Beat in the cornflour, lemon juice and vanilla extract.
- Spread out into an oval ~3cm thick on a lined baking sheet
- Bake at 140C/Gas Mark 1 for ~1 hour until the top is a pale biscuit colour.
- Remove from the baking sheet (peeling off the lining paper) and allow to cool fully on a wire rack.
 And straight out of it. The cracks are from me being somewhat ham-fisted when removing the teflon baking liner.
 I also reduced the remaining cherry gel down to about half its original volume and added a generous slug of cherry brandy. I'll serve the pavlova with this sauce and the remaining whipped cream.
Chocolate Fudge Tart with an Orange Sauce
Ingredients
For the case
- 170g Plain flour
- 85g Butter
- Very cold water
- 140g Plain chocolate
- 170g Butter
- 340g Caster sugar
- 95g Plain flour
- 6 Eggs, lightlybeaten
- 170ml Orange juice
- 2 tbsp Grand Marnier
- 225g Caster sugar
- 1 tbsp Orange zest
- Make the shortcrust flan case. Rub the butter into the flour until it resembles coarse breadcrumbs.
- Add 2 tbsp very cold water to mix into a crumbly dough, first with a knife then with one hand.
- Cover and refrigerate for 30 mins.
- Roll out to line a greased flan ring and prick the bottom of the flan case all over.
- Weigh down with baking beans.
- Bake at ~200C/Gas Mark 6 for ~20 mins then remove the baking beans and return to the oven for a further 10 mins until lightly golden.
- Remove from the oven and allow to cool fully.
- Make the filling. Melt the chocolate and butter together over a double boiler. Remove from the heat.
- Mix the sugar, flour and eggs in a bowl and whisk until well blended.
- Stir in the chocolate/butter mixture and pour into the flan case.
- Bake at 180C/Gas Mark 4 for ~50 mins until the filling is just set.
- Allow to cool on a wire rack.
- Make the sauce. Mix the orange juice, Grand Marnier and sugar saucepan. Cook over a low heat stirring constantly until reduce by half.
- Stir in the zest and allow to cool.
 And the completed flan ready for the oven.
 And straight from the oven. It's slightly burnt, but not horrendously so...
 Right, bring on the party!
The completion of the cake
Now that the cake's cooled down fully, I can finish it off! Here's the cherry gel before mashing (step 10).
 The cake cut and stacked.
 And a little photo series of the cake being assembled.
 As you can see, spreading cream over the cherry layer was difficult and resulted in lots of the cherry being pushed out. I had loads of cherry gel left over, so I decided to add cherry to the second layer too.
 So for the second layer, I tried doing the cream first. Unfortunately, I forgot to sprinkle any kirsch over the middle portion of the cake though.
 Mistake! Turns out it's important to do the cherry before the cream - otherwise the liquid can't get through to the sponge and be absorbed, so it just runs everywhere.
 But never mind. On goes the top (end of step 16).
 Sculpting of the cream over the sides (step 18). Working with the cream was reminiscent of applying tile grout...
 And covered with grated chocolate (step 19). If you're wondering how to do this, I actually picked up pinches of chocolate and threw them at the cake. It's messy, but it works fairly well!
 I've got no piping bag and I don't know how to pipe anyway, so the "rosettes" are (pretty messy) quinelles of cream instead. The top also had more cherry gel as well as grated chocolate. But I think the end result looks pretty darned good, personally. There will be cake...
Friday, 4 December 2009
From the land of cuckoo clocks*
Okay, I've shied away from it for too long. It's time for me to get over my fear of falling completely flat on my face (at least in culinary terms) and just bake it. I refer, of course, to the Black Forest Gateau, which will be making an appearance in the upcoming dessert party. This baking year, and hence this blog, started with a cake-that-definitely-wasn't-a-black-forest-gateau, but was definitely intended as being along the same lines. Now, I think I'm ready to give the real thing a shot, or as-close-to-the-real-thing-as-availability-of-ingredients-will-allow at least. The recipe is as authentic as I could find - at least it's very much based on a couple of recipes I found that were in German...
Black Forest Gateau
Ingredients
For the cake:
 And the batter about to be put in the oven (step 5). I actually forgot to add the flour until after I'd folded the egg white in, so hopefully I didn't knock too much air out of the mixture - though I did come perilously close to accidentally baking a flourless Black Forest Gateau!
 Straight from the oven - the top looks a bit uneven and slightly burnt...
 ...But it looks rather awesome when turned out upside-down!
 Stay tuned for the next exciting installment of the story of the Black Forest Gateau!
*Yes, cuckoo clocks actually originate from the Schwarzwald in southern Germany, not Switzerland as most people seem to think.
**If anyone is wondering (as I was) where you can get sour cherries in the UK, I eventually found them in syrup in big jars in Lidl. They're cheap too - 99p for a jar with 350g (drained weight) of Morello cherries.
Black Forest Gateau
Ingredients
For the cake:
- 140g Dark chocolate
- 75g Butter
- 6 eggs
- 180g Caster sugar
- 100g Plain flour
- 50g Cornflour
- 2tsp Baking powder
- 800g Drained sour cherries**
- 500ml Cherry juice
- 4tbsp Cornflour
- 2tbsp Caster sugar
- 100ml Kirsch
- 75ml Cherry brandy
- 800ml Double cream
- 45g Icing sugar
- 3tsp Vanilla extract
- Glacé cherries
- 100g Grated dark chocolate
- Separate the eggs. Beat the egg whites until stiff.
- Whisk the egg yolks with the caster sugar until fluffy.
- Melt the chocolate and butter over a double boiler. and stir into the egg yolks/sugar mixture.
- Sift the flour and baking powder into the mixture and fold in.
- Fold in the egg whites.
- Pour into a lined cake tin and bake at 175C/Gas Mark 4 for 40-45mins.
- Remove from tin and allow to cool completely upside-down on a wire rack.
- Cut the cooled cake horizontally into three layers.
- Dissolve the cornflour and caster sugar in the cherry juice and bring to the boil.
- Add the cherries and allow to cool slightly, then add half of the kirsch.
- Mash into a gel and allow to cool completely.
- Spread the cherry gel over the bottom layer of the cake.
- Beat the cream, icing sugar and vanilla extract until stiff.
- Spread a quarter of the cream over the cherry mixture and add the second layer of the cake.
- Sprinkle the remaining kirsch over the second layer.
- Spread another quarter of the cream over the top of the second layer and then add the top of the cake.
- Sprinkle the cherry brandy over the cake.
- Reserve enough cream to pipe cream rosettes around the edge. Cover the sides of the cake with the remaining cream.
- Cover the cream and top the cake with grated chocolate.
- Pipe cream rosettes around the edge of the top and place a glacé cherry on top of each one.
 And the batter about to be put in the oven (step 5). I actually forgot to add the flour until after I'd folded the egg white in, so hopefully I didn't knock too much air out of the mixture - though I did come perilously close to accidentally baking a flourless Black Forest Gateau!
 Straight from the oven - the top looks a bit uneven and slightly burnt...
 ...But it looks rather awesome when turned out upside-down!
 Stay tuned for the next exciting installment of the story of the Black Forest Gateau!
*Yes, cuckoo clocks actually originate from the Schwarzwald in southern Germany, not Switzerland as most people seem to think.
**If anyone is wondering (as I was) where you can get sour cherries in the UK, I eventually found them in syrup in big jars in Lidl. They're cheap too - 99p for a jar with 350g (drained weight) of Morello cherries.
Subscribe to:
Posts (Atom)
