Wednesday 28 December 2011

A white Christmas...

Well, it may not have snowed, but we can still have a white Christmas. Time for the first try baking a white sourdough loaf. I'm keeping the exact same recipe as before, but just substituting white strong flour for wholemeal strong flour. Aage has been fed solely on wholemeal flour though, so there are still flecks of wholemeal throughout the dough.

The round one was shaped and kneaded by me; the other one by my brother. They're both look really quite tasty!

Tuesday 20 December 2011

Aage comes home!

I'm home for the break now, and Aage came with me! He needed feeding, and my mum's been pretty keen to bake a sourdough loaf, so we're doing another standard sourdough loaf. The sponge is made now and we'll turn it into a dough tomorrow morning :o).

Sunday 4 December 2011

C is for cookie...

(...that's good enough for me). I made Trish a batch of cookies. The same basic recipe as usual, but half were chocolate and almond cookies and half were bacon cookies. Also as seems to be normal now, I made a hash of measuring out the ingredients. This time, they ended up rather a lot cakier than usual. Still pretty tasty though :o).

I was right

Yup, all good :o). I haven't actually tasted it yet, but it certainly looks good! The biggest issue with having such a moist dough so far is how much harder it is to slash the top of it before baking. These won't have as nice a crust as the first loaf did as a result.

An unintentionally moist sourdough

It happened again... I ran out of flour. But I decided that there was just enough to make a workably moist dough, so all was well. I think. We'll see when it finishes baking! Anyway, here's the recipe:

An Unintentionally Moist Sourdough
Ingredients
For the sponge
  • 200g Strong wholemeal flour
  • 250ml Water
  • Decent chunk of sourdough starter
For the dough
  • 10g Salt
  • 180g Strong wholemeal flour
Method
  1. Mix together the ingredients for the sponge, put in a bag and leave overnight.
  2. Add the salt and the rest of the flour.
  3. Knead until smooth.
  4. Make a round, put in bag and let rise for about an hour.
  5. Tip out, form into a round and leave to rise for another hour.
  6. Repeat step 5.
  7. Deflate, divide into two portions, shape into loaves, put in a bag and leave to prove (I ended up going out and left it for about 8 hours!)
  8. Bake at the highest possible oven temperature for ~10 minutes then turn down to ~200C for a further 30 minutes.

Here are the loaves before proving.What they look like ready for the oven.

Wednesday 30 November 2011

Verdict: My first sourdough loaf

I caved. I couldn't stand the temptation any more. So what's the verdict? In a word: Gorgeous! It was almost perfect. It had that lovely sourdough acidity--not as punchy as some sourdoughs that I've had before, but unmistakeable, gentle and still strong enough to be noticeable. And the crust was perfect - softish on the bottom, medium on the sides and perfectly crunchy on the top - crunchy but not hard. And the soft inside was chewy and satisfying. The only thing I would have changed about it would have been to let it prove for a bit longer. Just the tiniest hint more air on the inside would have taken it from a really excellent loaf to the-best-loaf-ever. Really, I think this is the best loaf of bread I've ever baked!

Finishing off the loaf

I'd left it for a few hours and decided that I didn't want to go to bed too late, so it's not quite doubled in size, but it's definitely risen at least. Let's get this thing into the oven!Out of the oven, it's looking really rather good! I'm not 100% certain it's baked for long enough, but it's been in the oven for over an hour now, and I'm getting impatient. I'm really looking forward to trying it, but I'm also resisting the urge to dive straight in - letting it cool a bit before cutting it open will help stop it going quite so dry quite so quickly. It smells wonderful!

Progress!

What a difference six hours makes! Here's the dough when I got back from the lab.I'm a bit concerned about the yeast running out of food, so I decided to skip straight to step 7 and deflated it and formed it into a round. It's also on a plate to make it easier to judge how much it's risen and to transfer on to a baking tray.

A dough comes together

Here we are, at the end of step 4. I'm not entirely certain that I've kneaded it quite enough, but we'll see!Maybe I'm a bit paranoid, but I certainly don't want my housemates to throw my bread away by accident!I'm going to head into the lab for a bit now, so my bread will have rather a lot longer than an hour to rise. But I can't see that being a problem :o).

Tuesday 29 November 2011

Meet Aage!

I'd like to introduce you all to my pet yeast, Aage. Why Aage? Well, he's named after Aage Bohr, a Nobel prize-winning physicist and the son of Niels Bohr. Aage and Niels went by the names Jim and Nicholas Baker when they were working on the Manhattan project in the 1940s, so it just kinda seemed quite appropriate. Plus, I think Aage's quite a cool name!Aage is settling in to his new home (although he's just moved from a kitchen cupboard to the fridge, so hopefully he'll be happy there too). I just fed him, so it's time to bake my first ever sourdough loaf (or make a start, at least).

My First Sourdough Loaf
Ingredients
For the sponge
  • 250g Strong wholemeal flour
  • 300ml Water
  • The discarded half of Aage*
For the dough
  • 300g Flour
  • 13g Salt
Method
  1. Mix the ingredients for the sponge together and put into a clean black bin bag, tucking the end under the bowl.
  2. Leave overnight.
  3. Add the remaining ingredients and form into a dough.
  4. Knead until smooth and springy.
  5. Form into a round, place back into the bowl and bag and leave to rise for an hour.
  6. Tip out, form into a round again and leave to rise again.
  7. Deflate the dough and shape into a loaf.
  8. Place back in the bag and leave to prove until doubled in size.
  9. Bake at the hottest oven possible for 10mins and then turn down to 180C/Gas Mark 4 until done; roughly a further 30-40minutes.
*If you're a bit confused by this, when you feed the sourdough starter, you throw half of it away (or bake with it) and replace the amount you threw away with flour and water. So this probably amounts to about 200-250ml of my sourdough starter.

Here's the sponge!

Friday 25 November 2011

Another sourdough update

Woo hoo! I've successfully caught and tamed some yeast - Look at the frothing!I've now dumped half of the starter out and replaced it with more flour and water, so it's getting close to when I can bake my first loaf with my new pet yeast. I might even be able to bake it as soon as this weekend...

Thursday 24 November 2011

The latest advances in sourdough technology

One day later, we've got the first signs of fermentation! It's a little hard to see from the photo, but there are some tiny bubbles rising to the surface, and there's the tiniest hint of a yeasty smell. Okay, it's not the massive frothing and pungent smell of bread dough that I'd been hoping for, but it's fermentation nonetheless.Time for its first feeding then! I think I used too much water initially, so I've added more flour than water to thicken the batter up a bit. Back into the airing cupboard it goes!

Wednesday 23 November 2011

Adventures in sourdough

I love sourdough breads. I love the slight tartness of the taste, that slightly rustic texture and I absolutely adore the concept of harvesting wild yeast. The very idea makes me think of the baker as a hunter - coming back successful from the hunt and feeding his family on the spoils. Okay, so the organisms you hunt are single-celled and rather tiny, but it's still a pretty cool image.

The problem with sourdough is keeping your starter going. It had always been that much too difficult for me to do - living in college, someone was bound to throw my starter away, thinking it was milk that had gone off or something. But now I'm in a flat with two others who like to bake, so I think they might just be willing to put up with my funky-looking sourdough starter in the fridge. The time for talk has passed - it's time to get hunting!

So here's step one of my first ever sourdough loaf. Let's go hunt and tame some yeast! I'm basically following the bread bible's procedure for sourdough.

Sourdough Starter
Ingredients
  • Flour
  • Water
Method
  1. Whisk together ~150g flour and ~250ml water in a lidded container, incorporating as much air as possible.
  2. Put a lid on and leave in a warm place until signs of fermentation are seen.
  3. Whisk in another ~150g flour and ~250ml water and leave for another day.
  4. Tip out half of the starter and replace with ~150g flour and ~250ml water.
  5. Leave in a cool room.
Sounds simple, right? Well, hopefully it should be! I'm using M&S strong wholemeal flour for mine, and I've only got as far as step 1. But here are some photos anyway! This is how much flour I used (it's a 1 litre container).
With this much water.And that makes this much batter! It's not very exciting yet...

Friday 11 November 2011

Verdict: Rhubarb and apple crumble

Pretty darned good! It was about the best crumble topping I've ever managed (still slightly over-mixed I think, but not bad), and the balance of flavours was absolutely spot on. It could have done with cooking for a bit longer I think; the filling was very watery and the apples a little bit too firm, but the rhubarb went beautifully soft, which is the main thing in my opinion. It tasted wonderful though!

RhubarbRhubarbRhubarb!

I like rhubarb :o). I'm having Jen and Julian over for dinner tonight to thank them for putting me up between tenancies for yet another year, and I was wondering what to do for dessert. And then I spotted rhubarb on the shelf when I went shopping for ingredients, so I think it's time to do another crumble!

Rhubarb and Apple Crumble
Ingredients
For the filling
  • 300g Rhubarb
  • 300g Apples
  • 125g Caster sugar
  • ~1tsp Ground cinnamon
  • ~1tsp Ground ginger
  • ~1/2 tsp Ground nutmeg
  • A decent slug of cherry brandy
For the topping
  • 120g Butter
  • 200g Plain flour
  • 25g Caster sugar
Method
  1. Chop the rhubarb into ~20mm chunks.
  2. Core and dice the apples.
  3. Grease an ovenproof dish and pour the rhubarb and apple chunks into it.
  4. Sprinkle the sugar, cinnamon, ginger, nutmeg and cherry brandy over the fruit.
  5. Rub the butter and flour together until it resembles coarse breadcrumbs.
  6. Heap the topping over the fruit layer.
  7. Sprinkle the sugar over the top.
  8. Bake at 180C for ~45-60 mins until golden.
Okay, it's just fruit in a bowl, but don't the colours look amazing?!I think I've made the same mistake I always make with crumbles - mixing the flour and butter together too thoroughly. We shall see...Looks good!

Monday 7 November 2011

It's like Fight Club, only with pastry instead of blood and sugar instead of violence

There's a small group of us who normally dine together in the Balliol SCR on a Monday evening. A few weeks ago, Bob and I had rather a nice idea; an SCR baking club. I have no idea if it'll actually get off the ground, but I thought that even if it doesn't, it'd be quite a nice one-off. I'm baking another Upside-down Tarte Tatin. It's almost exactly the same recipe as last time around. This time, I'm using Royal Gala apples instead of Braeburns, because they were on special offer, and I didn't have any lemon juice, so I threw in a little splash of cider vinegar to give it the acidity. I also chucked in a bit of cinnamon, because I'm firmly of the opinion that you can't go wrong with apples and cinnamon!

Looks pretty gorgeous, doesn't it?

Saturday 15 October 2011

More bacon!

Trish wouldn't believe me either, so I had to bake another batch of bacon cookies. Same recipe as last time, although I made a little bit of a hash of it this time around. Still tasty though!

Wednesday 28 September 2011

Where's the second verdict, dammit?

Well, I told you to stay tuned... Unfortunately, there was a slight fridge-related mishap. A mysterious (read: we never worked out where it came from) leak happened in the fridge, soaking the galette. Seeing as we had no idea what the leak was, I didn't exactly want to eat it. Alas, the rest of the galette went in the bin; which was a real pity, because it was pretty darned good. Not quite perfect, but really rather good. Oh well, I'll have to try again sometime!

Sunday 25 September 2011

Verdict part 1: Galette des rois

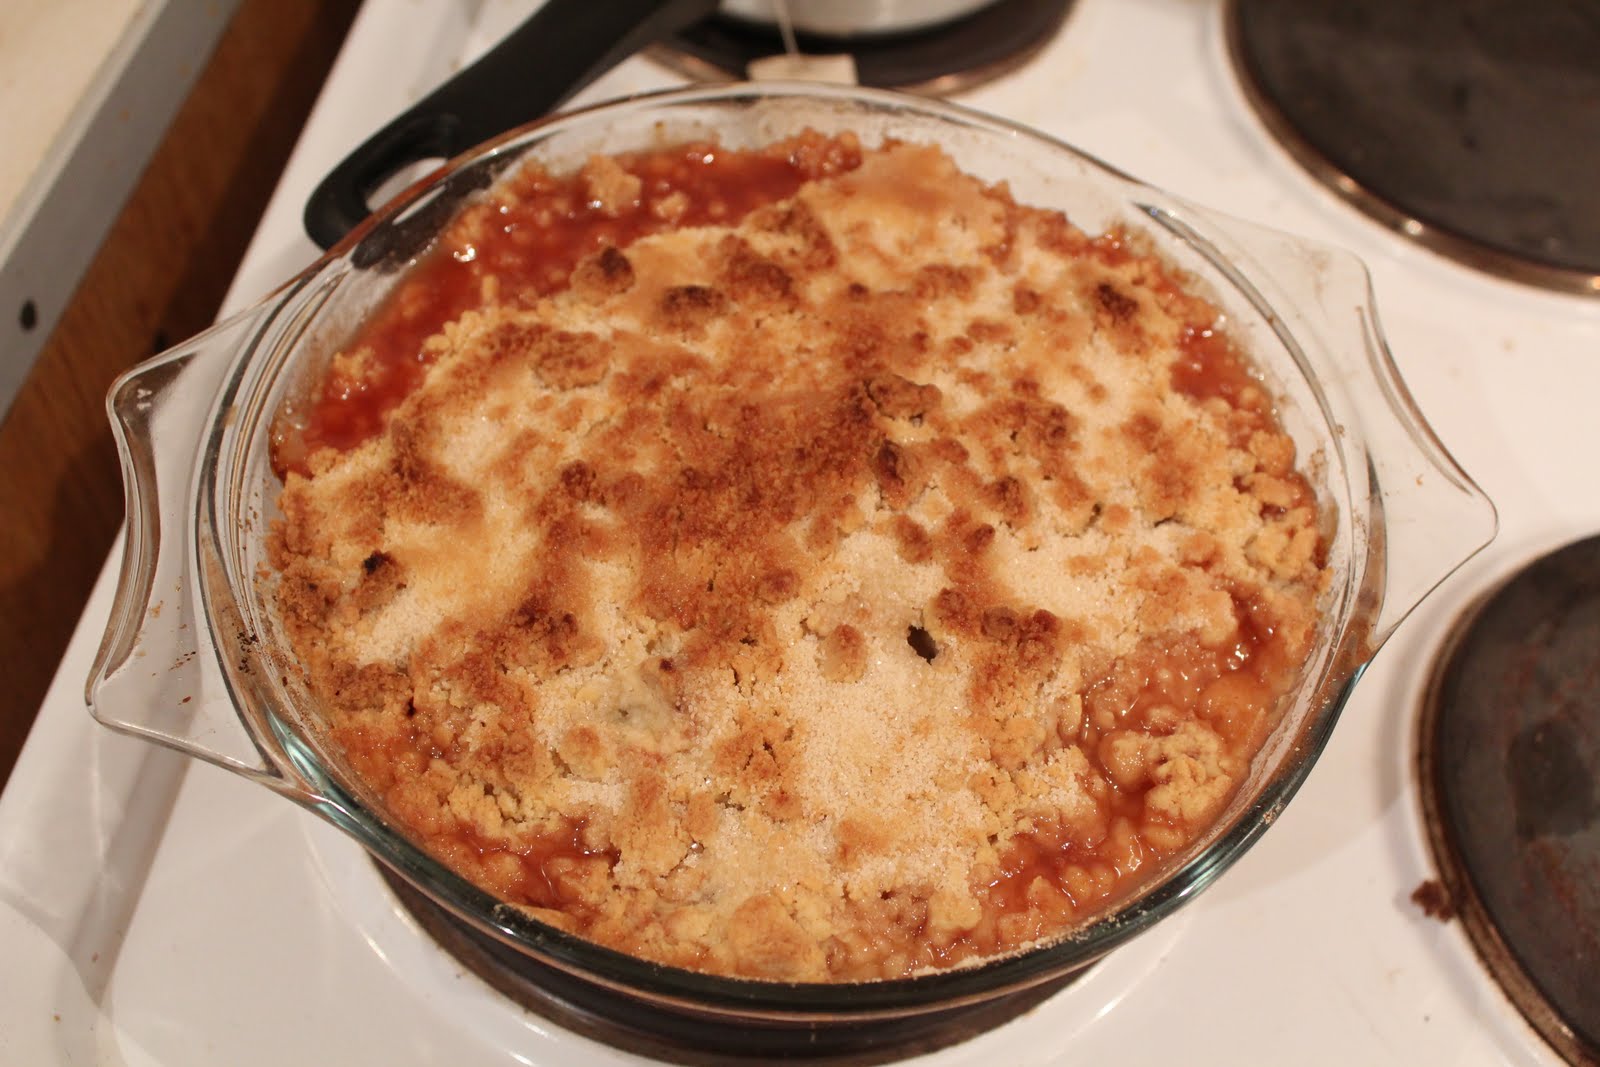
While it's still warm straight from the oven, here are my thoughts. As expected, the puff pastry didn't quite puff up fully - but it definitely started to puff up. Better than I'd expected, and not too far off what I remember the pastry on the ones in bakeries in Paris being like. The frangipane doesn't seem sweet enough to me; I expect frangipane to be ludicrously sweet, like marzipan levels of sweetness, but this is much tamer in that respect. That might not be a bad thing, depending on your personal preference though. It's gorgeously rich, but there's something just not quite right about it. I can't quite put my finger on it and it's so close to the galettes I've had in France, but just not quite there. I think it'll be even better cold, so stay tuned for part 2 once it's cooled down. It's pretty darned good as it is though!

The cake of kings

I found myself rather unexpectedly free this weekend, so I thought I'd seize the opportunity to bake something! I settled on trying to bake a Galette des Rois; it's one of my favourite pastries, a frangipane-filled, puff pastry concoction. And naturally, I'm not wussing out and using pre-made pastry! The pastry recipe is taken from the Good Book (that's Leith's Cookery Bible, for any of you non-believers who might not be familiar with the book that guides us). The frangipane filling and the rest of the recipe is basically cribbed from this one.

Galette des Rois
Ingredients
For the pastry
  • 200g Plain flour
  • 170g Butter
  • ~125ml Cold water
For the filling
  • 100g Butter
  • 100g Caster sugar
  • 100g Ground almonds
  • 3 Eggs
  • 1tbsp Dark rum
  • 1 Egg yolk
  • 1tbsp Milk
Method
Make the pastry
  1. Rub 30g of butter into the plain flour.
  2. Stir in enough cold water with a knife to form a dough.
  3. Knead until just smooth.
  4. Wrap in cling film and refrigerate for ~30 mins.
  5. Roll the dough into a rectangle ~30x10cm.
  6. Tap the remaining 140g butter into a rectangle ~9x8cm and place in the centre of the dough.
  7. Fold the dough over on both sides to enclose the butter, pressing the sides to seal it.
  8. Turn the dough through 90 degrees and roll out quickly and lightly until it is three times longer than it is wide.
  9. Fold it into thirds and rotate again.
  10. Roll out and fold into thirds again.
  11. Wrap in cling film and refrigerate for ~30 mins.
  12. Repeat the rolling and folding (2 rolls and 2 folds), then wrap and refrigerate for ~30 mins.
  13. Repeat step 12 (totalling three sets of two turns).
  14. Refrigerate.
Make the filling
  1. Cream the butter, almonds and sugar together.
  2. Beat in the eggs one at a time.
  3. Mix in the rum.
Assemble the pastry
  1. Divide the pastry into two equal parts.
  2. Roll each part into a circle ~25cm in diameter.
  3. Place one circle on a baking sheet lined with baking parchment.
  4. Spoon the almond cream onto the pastry circle, leaving ~5cm around the outer edge uncovered.
  5. Beat the egg yolk and milk together to make an egg wash. Brush the edge of the circle with the egg wash.
  6. Place the other pastry circle on top and seal firmly around the edge.
  7. Refrigerate for 1 hour.
  8. Brush with the egg wash.
  9. Score a pattern in the top with the tip of a sharp, non-serrated knife.
  10. Bake at 180C for ~40 mins until golden.
You're supposed also to brush it with a sugar syrup while it's still hot from the oven, but I can't be bothered!

Here's the dough after kneading (end of step 3). Looks like dough (so far, so good!).The frangipane cream reading for filling.The assembled galette - I accidentally brushed the top with the egg wash before fridging it. In hindsight, maybe it would have been better to do this just before it went into the oven, but I don't think it'd make too much difference. I was a bit crap at rolling out the puff pastry early on and kept tearing the dough, so I'm not sure how well it'll puff up in the oven. We'll find out!Here's what it looks like straight out of the oven. The top seems to have shifted in the oven, but otherwise it looks pretty good!

Monday 5 September 2011

Truffles again...

I've been saying that I'd make Trisha some truffles for a while now. I'm seeing her tomorrow evening, so it seemed like as good as time as any! It's the same procedure as usual - this time, the ingredients list is 200g dark chocolate (48% cocoa), 150ml double cream and 1tsp vanilla extract, plus 100g extra dark chocolate (85% cocoa) for the coating.

Friday 17 June 2011

Verdict: Hefezopf/Butterknoten

Oh. My. Word. Wonderful. No two ways about it, this is delightful. If you like slightly sweet breads (as I very much do), this is an absolute treat - not quite the Butterknoten I remember, but very similar and just as lovely. But just don't do that horrible thing that most people seem to do to plaited breads and cut it into slices - just grab a chunk and rip it off! Much more satisfying! It's really, really good just as is (particularly while still warm from the oven!), but it'd make a lovely breakfast food with jam/marmalade/Nutella.

I'm rather pleased with this one!

Butterknoten!

A few years ago when I was in Switzerland, I came across the most amazing bread in the Co-op. It was called Butterknoten (literally "butter knot"), was slightly sweet and unbelievably buttery. For the last few years, I've been looking, on and off, for a recipe for it, to no avail. But the other week, during my most recent search for one, I discovered that it's not usually called Butterknoten. There's a very similar, common Swiss bread called Zopf (literally "braid"), which looks similar but is totally savoury, and a German variant called Hefezopf ("yeast braid") which, from the recipe, looks exactly like what I remember. It's always hard to tell from the recipe if you've never baked something like it before though, so there's only one thing for it: Time to get baking! The recipe I'm using is near-as-worth-a-damn half-quantities of this one. I couldn't be bothered to make pearl sugar though, although I'm sure it'd be absolutely wonderful! If this works well, maybe I'll try it next time...

Hefezopf/Butterknoten
Ingredients
  • 125ml Milk
  • 80g Sugar
  • 80g Butter
  • 1 sachet Fast-action yeast
  • 2 Eggs
  • 1/2 tsp Salt
  • 500g Strong flour
  • 1 Egg yolk
Method
  1. Heat the milk, sugar and butter together until melted and lukewarm.
  2. Whisk in the yeast, eggs and salt.
  3. Fold in the flour to form a dough and knead for a few minutes.
  4. Place in your trusty baking bin liner and leave for ~1hr to rise until doubled in size.
  5. Divide dough into four equal pieces.
  6. Roll each piece into a sausage ~50cm long.
  7. Braid into a plait*, tucking the ends underneath.
  8. Cover with a damp tea-towel and allow to rise for ~30mins
  9. Brush with the egg yolk.
  10. Bake at 190C for ~30-35 mins.
*There are many ways to do a four-strand plait. I went with this method (take the leftmost strand, bring it over two strands and back under one strand so that it ends up being the second-from-the-left, then repeat on the right hand side), which is linked from a rather nice blog post on how to make Challah - a similar, plaited bread.

One unexpected discovery I made: a warm mixture of milk, butter and sugar smells surprisingly appetising! It doesn't look remotely appetising though...Once the flour's incorporated, it forms a wonderfully soft, buttery dough (not overly surprisingly, given how much butter's involved!). I did have to add a touch more flour to get to this point though.The plait coming together.
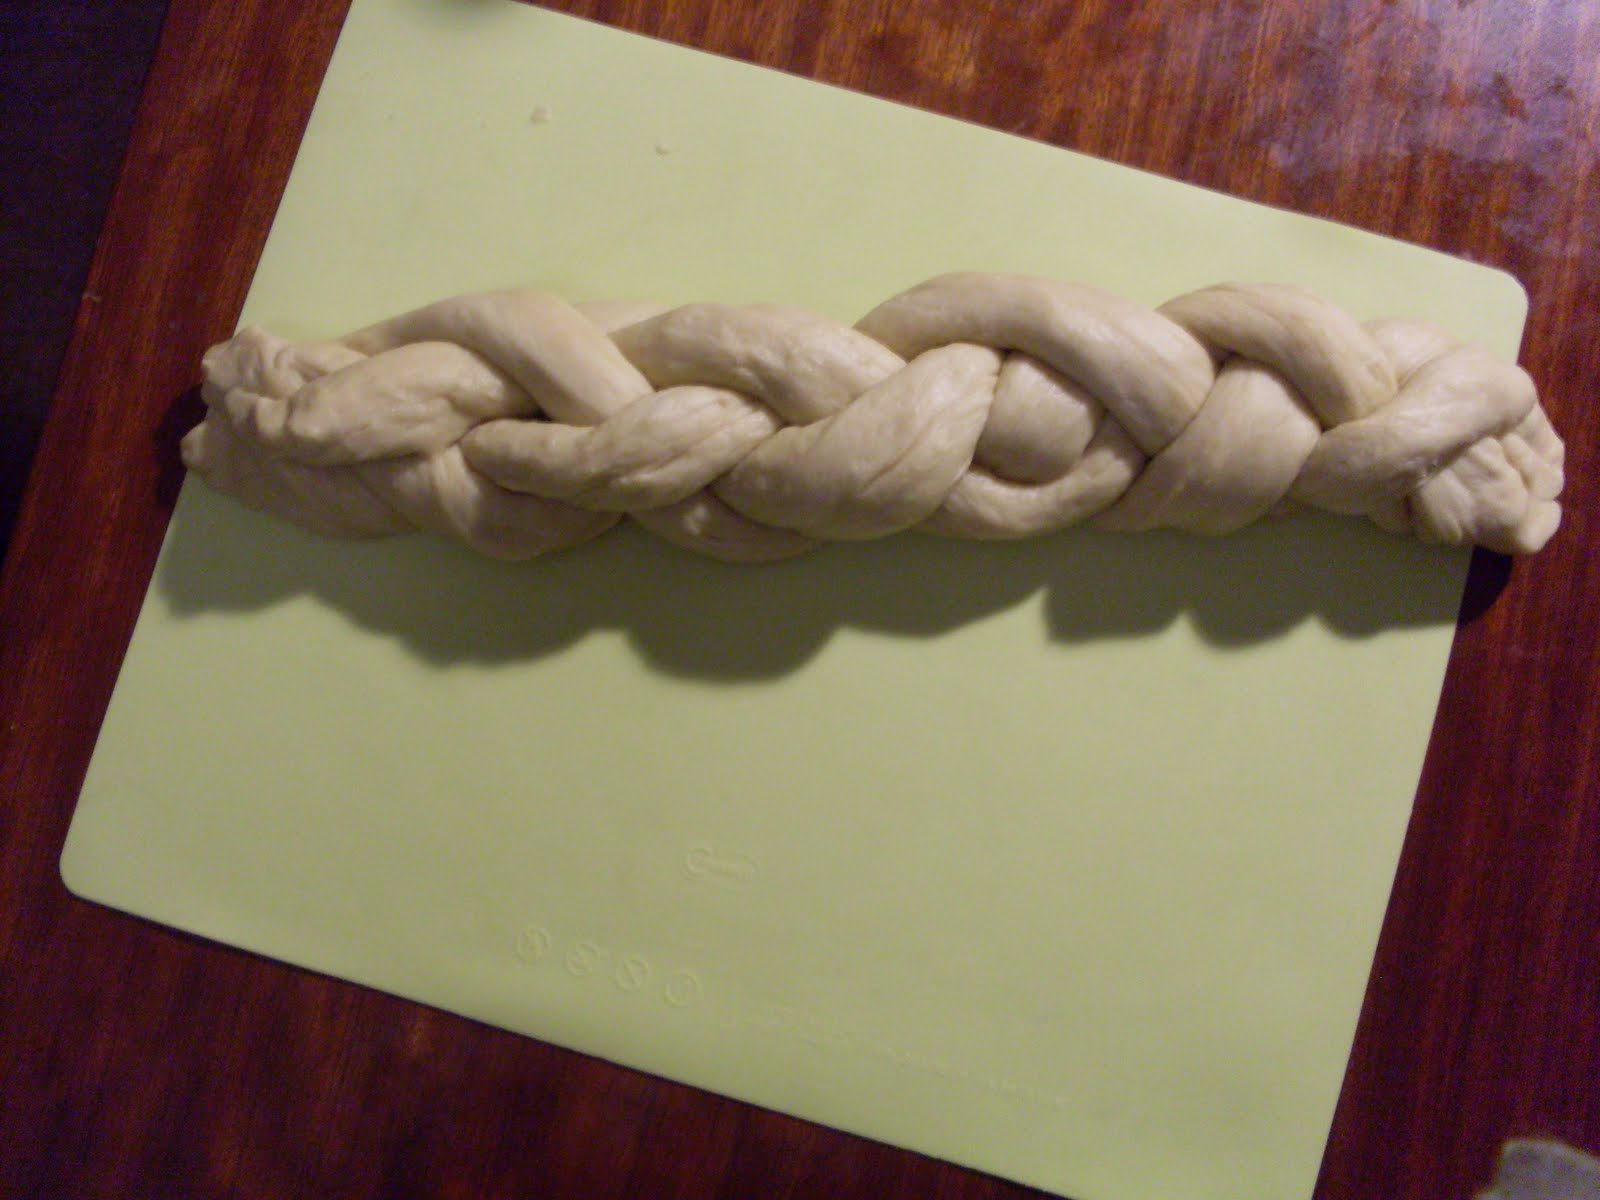
Here's the finished plait, ready for the final prove.Ready for the oven! I'm excited about it, aren't you?Fresh from the oven. As ever, it's a little burnt (stupid college oven...), but I think it looks pretty darned good personally! I hope it's cooked all the way through though...

Saturday 21 May 2011

Verdict: Chocolate cupcakes

They're a little disappointing. They're very like brownies, and are really rather edible, but I can't shake the feeling that they're not as good as the brownie recipe I've baked previously. I'd hoped they'd be more cakey than they are, but they're not enough like cakes to be cakes. But they're too much a halfway house between cake and brownie to be really good brownie either. It's good, but I'd rather have a good cake or a good brownie instead. I think if I'd not poked them and hadn't used any muscovado sugar, they'd have been lighter, airier and all around more cake-like, and that might be all that it would have taken. They're quite good, but they fall in a gap that doesn't really need filling.

It's cupcake time!

It's time for some cupcakes I feel. Only a small batch though, as I've only got one egg in at the moment.

Chocolate Cupcakes
Ingredients
  • 55g Butter
  • 50g Caster sugar
  • 50g Muscavado sugar
  • 1 Egg
  • 1tsp Vanilla extract
  • 50g Dark chocolate
  • 55g Plain flour
  • 1/2tsp Baking powder
  • Splash of milk
Method
  1. Cream the butter and sugars together until fluffy.
  2. Beat in the egg and vanilla.
  3. Melt the chocolate and fold into the mixture.
  4. Sift the flour and baking powder and gradually fold in to the mixture.
  5. Let down with milk to dropping consistency.
  6. Pour into cupcake moulds and bake at 180C for 20-25 minutes.
Here are the cupcakes ready for the oven. I think I should have added a little bit more milk, as the batter's a little thick.And here's the finished article. It's collapsed because remembering the recent volcano cake debacle, I got a bit scared partway through baking them and poked them all with a skewer to deflate them a bit. I hadn't expected them to collapse this much. Oops. Still looks pretty good though!

Sunday 24 April 2011

Verdict: Bannock-on-a-stick

Wow. Really rather good! Especially given that it takes about two minutes to make the dough, it's really rather excellent! As the recipe stands, it's a bit too buttery - more like a scone than bread. But for the second round, I halved the amount of butter in it and it's just perfect. We even added some fresh herbs to one of them which worked really nicely. It's really an excellent and incredibly easy addition to the standard barbecue fare!

Barbecue bread

I'm at home for the Easter weekend this year and we're having a barbecue. I thought it'd be fun to try doing some form of bread actually baked on the barbecue itself. Unfortunately, we've got nothing that would really work as a Dutch oven, so it's really got to be a bread that will stand being grilled rather than baked. Some form of bannock seemed like a good, simple option - and then I came across this website, which shows a simple bannock being grilled over an open fire on a stick. It looks tasty and involves fires and sticks - what more could you want?!

Bannock-on-a-stick
Ingredients
  • 100g Plain flour
  • 1tsp Baking powder
  • 1/4 tsp Salt
  • 3tbsp Butter
  • 2tbsp Milk
Method
  1. Mix the flour, baking powder and salt together and then rub the butter into the mixture.
  2. Add milk slowly to incorporate into a dough.
  3. Form into a ~1cm thick slab and wrap around a stick and grill over a fire or put on the barbecue, turning as needed.
Here's the dough.
Ready for the barbecue.