Tuesday, 28 February 2012

As English as apple pie...

The American's might use the phrase "as American as apple pie" a lot, but the apple pie predates the USA by quite a few centuries. Apparently, there's a printed apple pie recipe that dates back to 1381 (a quick Google turns it up easily, but the recipe itself isn't exactly very informative...). In any case, I'm a little ill, which means that I've not left the flat all day and so I've decided to bake! I got a gorgeous new pie dish for my birthday that I've yet to use, so this seemed like a perfect opportunity!

Apple Pie
Ingredients
  • 180g Plain flour
  • 85g Butter
  • ~2tbsp Cold water
  • 600g Braeburn apples
  • 80g Caster sugar
  • 1 1/2 tsp Ground cinnamon
  • 1/2 tsp Ground nutmeg
Method
  1. Rub the flour and butter together until it resembles coarse breadcrumbs.
  2. Add just enough cold water to form a dough.
  3. Place the dough in a freezer bag and refrigerate for ~30 mins.
  4. Roll out 2/3rds of the dough and line a pie dish.
  5. Peel, core and chop the apples and mix with the sugar and spices.
  6. Pour the apple mixture into the pastry-lined dish.
  7. Moisten the crust of the pastry.
  8. Roll out the remaining dough and place over the pie, pressing around the crust to seal.
  9. Poke a hole in the top to let the steam escape and bake at 180C for ~45 mins.
Here's the pie at the end of step 6. It's rather a small pie dish, so it turns out that I had quite a bit of apple mixture left over. Well, at least no one can complain about my pie being underfilled though!
Ready for the oven. I would have crimped the edge, but I didn't leave myself enough overhang.
Straight out of the oven. Looking good...


And ready for eating!

Saturday, 18 February 2012

Verdict 2: Wasabi and apple ganache

Okay, maybe it wasn't entirely my fault - I tried again (with half quantities), taking extra care not to overheat the chocolate. It was fine when I poured it out and definitely hadn't seized, but when I took it out of the fridge, it had separated out again. It's a shame really - I think the flavours are really nicely balanced, but I have no idea why it went grainy. Maybe I'll try adding some cream to act as an emulsifier sometime, but I think I'll leave this one alone for now.


Friday, 17 February 2012

Back to basics

I've been neglecting Aage. Like all pets, you really ought to play with them once in a while, so it's time for another loaf of bread! It's been a while since I've just done a plain wholemeal sourdough, so I'm just doing a normal, run of the mill (albeit half-size) wholemeal sourdough loaf. I am running a mini experiment though - I've made this a much drier dough than usual, and I'm interested to see how much less moist the end result is. It's not the most exciting experiment in the world, but it should be a useful one!

Verdict: Wasabi and apple ganache

It was absolutely horrible! But I should also rather hastily add that I don't think this is a flaw of the recipe, but letting the chocolate seize absolutely ruined any chance of it being nice. The texture was a really nasty grainy, vile mess. So this was entirely my fault for being careless - I've not done any chocolate work in quite a while and completely forgot how fickle it can be. The flavour was actually really interesting though - it seemed to be nicely balanced and really quite complex - so I think this recipe has some great potential, if you're not a muppet. I'll try it again soon (hopefully) and try to be a bit less stupid... so we'll reserve judgement until then!

Tuesday, 14 February 2012

Wasabi and apple ganache

A while ago, I was given a copy of Adventures With Chocolate by Paul Young. I hadn't got around to trying any of its recipes until now, but they all look absolutely amazing! One in particular caught my eye though, and today seemed like a good opportunity to try it!

Wasabi and Green Apple Ganache
Ingredients
  • 15g Wasabi paste
  • 200g Caster sugar
  • 250ml Apple juice
  • 200g Dark chocolate
Method
  1. Put the wasabi, sugar and apple juice in a pan and bring to a simmer.
  2. Simmer for 5 minutes.
  3. Pour over the chocolate and stir until smooth.
  4. Pour into ramekins and refrigerate to set.
Annoyingly, I was a bit careless with it and let the chocolate seize. Ah well, I'm sure it'll be okay - just maybe not as smooth as it could be! We shall see...

Sunday, 5 February 2012

Verdict: Spelt sourdough

Well, it's good, but not altogether very different from a normal white loaf baked with regular wheat flour. In fact, there's very little difference that I could discern - it's maybe very slightly chewier, but that's it really. Nice, but nothing special.

Verdict: Lemon meringue cupcakes

Oooh, these are really nice. The batter was indeed a little too thick, so the cupcakes themselves could have been a little softer. But the taste was just wonderfully delicate and perfectly balanced. The lemon curd was tart, but not too sour; the cake was sweet but not overpoweringly so and the meringue was just a wonderful counterpoint to everything else. This is a really nice recipe - though I'm not certain it's entirely worth the faff, it's definitely a good cupcake!

It's a baking day!

I had been intending to go into the lab today and get a load of work done, but seeing as it's horribly snowy and icy outside, I decided that it'd be better spent as a baking day instead. So while the spelt bread's rising, I thought I'd make cupcakes. Usually, when I see a recipe I tweak it slightly to my liking - this time around though, the only thing I've changed is that I substituted 1tsp of vanilla extract for the vanilla pod, because I'm too cheap to use real vanilla pods! The recipe I used is this one, from a Channel 4 programme.

Lemon Meringue Cupcakes
Ingredients
For the lemon curd
  • 90g Caster sugar
  • Juice of 1 lemon
  • 55g Butter
  • 1 Egg
For the cake
  • 100g Butter
  • 100g Caster sugar
  • 1tsp Vanilla extract
  • 2 Eggs
  • 100g Plain flour
  • 1/2tsp Baking powder
  • Zest of 1 lemon
For the Italian meringue
  • 50ml Water
  • 100ml Caster sugar
  • 2 Egg whites
Method
  1. Whisk all of the ingredients for the lemon curd together over a double boiler and cook over steadily simmering water for ~10mins, whisking continuously, until the mixture thickens to a custard-like consistency.
  2. Remove from heat and set aside to cool.
  3. Cream the butter, sugar and vanilla for the cake together until light and fluffy.
  4. Beat in eggs one at a time.
  5. Fold in the flour and lemon zest.
  6. Spoon a few teaspoons of the cake batter into cupcake cases. Add one teaspoon of lemon curd, then cover with more cake batter.
  7. Bake at 180C for 15-20 mins until golden brown and the cupcake centre springs back after being lightly pressed.
  8. Remove to a wire rack to cool.
  9. Dissolve the caster sugar in the water over a gentle heat to form a syrup.
  10. Whisk the egg whites to soft peaks.
  11. Gradually pour the sugar syrup into the egg whites while whisking continuously, and whisk until thick and glossy.
  12. Pipe the meringue over the top of the cupcakes and gently toast with a blow torch.

Here's the lemon curd at the end of step 1.Ready for the oven. The batter feels a little thick.Straight out of the oven - they're looking pretty good!Check out my meringue! How amazing does that look?!I can't pipe very well :o(.But they still look pretty gorgeous when toasted, no?

An ancient loaf

I've been curious about using different types of flour for quite a while now. Recently, I finally went and got myself some spelt flour, so I thought I'd see what baking with spelt was like. Spelt is a particular sort of wheat that was around back in Roman times and still survives to this day. It's the same recipe as my usual sourdough (500g flour, 200ml water, 13g salt, half of Aage), but made with (white) spelt flour. I didn't use the sponge method, so it's all just thrown together in one go.

The spelt flour is really fine - about halfway between regular wheat flour and cornflour. It has a slight tendancy to clump, but it forms such a silky dough! It's been the most satisfying dough to knead that I've found so far (although that might partly be because I used warm water and it's a ridiculously cold day!), and the gluten seems to develop incredibly easily compared with normal bread flour. Here's the dough at the end of the knead, about to start the first rise. It's rather a wet, soft dough as you can see, but remarkably, it's not actually all that sticky either.

Sunday, 8 January 2012

Verdict: Olive sourdough

It's good. Not world beating, but a good loaf. Lovely and moist with a really excellent crust - the olives give it some flavour, but really it's just a loaf of (good) white bread with bits of olives throughout. It is good, but I think I'd rather have a plain wholemeal sourdough to be honest!

Improving white sourdough

I just realised that I never put a verdict on the white sourdough loaf up. Well... it was dull. It just didn't have anywhere near the same depth of flavour that the wholemeal loaves do; actually, it barely had any flavour at all. But it did have a lovely texture - rather a lot like ciabatta. And so, I thought I'd try baking another small white loaf and throwing chopped olives through it. I just kneaded in about 50g of drained olives after the (short) first rise, immediately before the prove - I just hope that the oil from the olives doesn't make the bread too soft when it's baked! Alas, as ever, I ran out of white flour (a problem compounded by my adding too much water), so it's not a completely white sourdough loaf, but it's probably about 80% white flour and 20% wholemeal..

How beautiful does this one look?!

Wednesday, 28 December 2011

A white Christmas...

Well, it may not have snowed, but we can still have a white Christmas. Time for the first try baking a white sourdough loaf. I'm keeping the exact same recipe as before, but just substituting white strong flour for wholemeal strong flour. Aage has been fed solely on wholemeal flour though, so there are still flecks of wholemeal throughout the dough.

The round one was shaped and kneaded by me; the other one by my brother. They're both look really quite tasty!

Tuesday, 20 December 2011

Aage comes home!

I'm home for the break now, and Aage came with me! He needed feeding, and my mum's been pretty keen to bake a sourdough loaf, so we're doing another standard sourdough loaf. The sponge is made now and we'll turn it into a dough tomorrow morning :o).

Sunday, 4 December 2011

C is for cookie...

(...that's good enough for me). I made Trish a batch of cookies. The same basic recipe as usual, but half were chocolate and almond cookies and half were bacon cookies. Also as seems to be normal now, I made a hash of measuring out the ingredients. This time, they ended up rather a lot cakier than usual. Still pretty tasty though :o).

I was right

Yup, all good :o). I haven't actually tasted it yet, but it certainly looks good! The biggest issue with having such a moist dough so far is how much harder it is to slash the top of it before baking. These won't have as nice a crust as the first loaf did as a result.

An unintentionally moist sourdough

It happened again... I ran out of flour. But I decided that there was just enough to make a workably moist dough, so all was well. I think. We'll see when it finishes baking! Anyway, here's the recipe:

An Unintentionally Moist Sourdough
Ingredients
For the sponge
  • 200g Strong wholemeal flour
  • 250ml Water
  • Decent chunk of sourdough starter
For the dough
  • 10g Salt
  • 180g Strong wholemeal flour
Method
  1. Mix together the ingredients for the sponge, put in a bag and leave overnight.
  2. Add the salt and the rest of the flour.
  3. Knead until smooth.
  4. Make a round, put in bag and let rise for about an hour.
  5. Tip out, form into a round and leave to rise for another hour.
  6. Repeat step 5.
  7. Deflate, divide into two portions, shape into loaves, put in a bag and leave to prove (I ended up going out and left it for about 8 hours!)
  8. Bake at the highest possible oven temperature for ~10 minutes then turn down to ~200C for a further 30 minutes.

Here are the loaves before proving.What they look like ready for the oven.

Wednesday, 30 November 2011

Verdict: My first sourdough loaf

I caved. I couldn't stand the temptation any more. So what's the verdict? In a word: Gorgeous! It was almost perfect. It had that lovely sourdough acidity--not as punchy as some sourdoughs that I've had before, but unmistakeable, gentle and still strong enough to be noticeable. And the crust was perfect - softish on the bottom, medium on the sides and perfectly crunchy on the top - crunchy but not hard. And the soft inside was chewy and satisfying. The only thing I would have changed about it would have been to let it prove for a bit longer. Just the tiniest hint more air on the inside would have taken it from a really excellent loaf to the-best-loaf-ever. Really, I think this is the best loaf of bread I've ever baked!

Finishing off the loaf

I'd left it for a few hours and decided that I didn't want to go to bed too late, so it's not quite doubled in size, but it's definitely risen at least. Let's get this thing into the oven!Out of the oven, it's looking really rather good! I'm not 100% certain it's baked for long enough, but it's been in the oven for over an hour now, and I'm getting impatient. I'm really looking forward to trying it, but I'm also resisting the urge to dive straight in - letting it cool a bit before cutting it open will help stop it going quite so dry quite so quickly. It smells wonderful!

Progress!

What a difference six hours makes! Here's the dough when I got back from the lab.I'm a bit concerned about the yeast running out of food, so I decided to skip straight to step 7 and deflated it and formed it into a round. It's also on a plate to make it easier to judge how much it's risen and to transfer on to a baking tray.

A dough comes together

Here we are, at the end of step 4. I'm not entirely certain that I've kneaded it quite enough, but we'll see!Maybe I'm a bit paranoid, but I certainly don't want my housemates to throw my bread away by accident!I'm going to head into the lab for a bit now, so my bread will have rather a lot longer than an hour to rise. But I can't see that being a problem :o).

Tuesday, 29 November 2011

Meet Aage!

I'd like to introduce you all to my pet yeast, Aage. Why Aage? Well, he's named after Aage Bohr, a Nobel prize-winning physicist and the son of Niels Bohr. Aage and Niels went by the names Jim and Nicholas Baker when they were working on the Manhattan project in the 1940s, so it just kinda seemed quite appropriate. Plus, I think Aage's quite a cool name!Aage is settling in to his new home (although he's just moved from a kitchen cupboard to the fridge, so hopefully he'll be happy there too). I just fed him, so it's time to bake my first ever sourdough loaf (or make a start, at least).

My First Sourdough Loaf
Ingredients
For the sponge
  • 250g Strong wholemeal flour
  • 300ml Water
  • The discarded half of Aage*
For the dough
  • 300g Flour
  • 13g Salt
Method
  1. Mix the ingredients for the sponge together and put into a clean black bin bag, tucking the end under the bowl.
  2. Leave overnight.
  3. Add the remaining ingredients and form into a dough.
  4. Knead until smooth and springy.
  5. Form into a round, place back into the bowl and bag and leave to rise for an hour.
  6. Tip out, form into a round again and leave to rise again.
  7. Deflate the dough and shape into a loaf.
  8. Place back in the bag and leave to prove until doubled in size.
  9. Bake at the hottest oven possible for 10mins and then turn down to 180C/Gas Mark 4 until done; roughly a further 30-40minutes.
*If you're a bit confused by this, when you feed the sourdough starter, you throw half of it away (or bake with it) and replace the amount you threw away with flour and water. So this probably amounts to about 200-250ml of my sourdough starter.

Here's the sponge!

Friday, 25 November 2011

Another sourdough update

Woo hoo! I've successfully caught and tamed some yeast - Look at the frothing!I've now dumped half of the starter out and replaced it with more flour and water, so it's getting close to when I can bake my first loaf with my new pet yeast. I might even be able to bake it as soon as this weekend...

Thursday, 24 November 2011

The latest advances in sourdough technology

One day later, we've got the first signs of fermentation! It's a little hard to see from the photo, but there are some tiny bubbles rising to the surface, and there's the tiniest hint of a yeasty smell. Okay, it's not the massive frothing and pungent smell of bread dough that I'd been hoping for, but it's fermentation nonetheless.Time for its first feeding then! I think I used too much water initially, so I've added more flour than water to thicken the batter up a bit. Back into the airing cupboard it goes!

Wednesday, 23 November 2011

Adventures in sourdough

I love sourdough breads. I love the slight tartness of the taste, that slightly rustic texture and I absolutely adore the concept of harvesting wild yeast. The very idea makes me think of the baker as a hunter - coming back successful from the hunt and feeding his family on the spoils. Okay, so the organisms you hunt are single-celled and rather tiny, but it's still a pretty cool image.

The problem with sourdough is keeping your starter going. It had always been that much too difficult for me to do - living in college, someone was bound to throw my starter away, thinking it was milk that had gone off or something. But now I'm in a flat with two others who like to bake, so I think they might just be willing to put up with my funky-looking sourdough starter in the fridge. The time for talk has passed - it's time to get hunting!

So here's step one of my first ever sourdough loaf. Let's go hunt and tame some yeast! I'm basically following the bread bible's procedure for sourdough.

Sourdough Starter
Ingredients
  • Flour
  • Water
Method
  1. Whisk together ~150g flour and ~250ml water in a lidded container, incorporating as much air as possible.
  2. Put a lid on and leave in a warm place until signs of fermentation are seen.
  3. Whisk in another ~150g flour and ~250ml water and leave for another day.
  4. Tip out half of the starter and replace with ~150g flour and ~250ml water.
  5. Leave in a cool room.
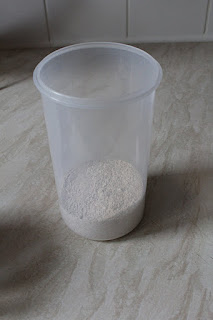
Sounds simple, right? Well, hopefully it should be! I'm using M&S strong wholemeal flour for mine, and I've only got as far as step 1. But here are some photos anyway! This is how much flour I used (it's a 1 litre container).
With this much water.And that makes this much batter! It's not very exciting yet...

Friday, 11 November 2011

Verdict: Rhubarb and apple crumble

Pretty darned good! It was about the best crumble topping I've ever managed (still slightly over-mixed I think, but not bad), and the balance of flavours was absolutely spot on. It could have done with cooking for a bit longer I think; the filling was very watery and the apples a little bit too firm, but the rhubarb went beautifully soft, which is the main thing in my opinion. It tasted wonderful though!

RhubarbRhubarbRhubarb!

I like rhubarb :o). I'm having Jen and Julian over for dinner tonight to thank them for putting me up between tenancies for yet another year, and I was wondering what to do for dessert. And then I spotted rhubarb on the shelf when I went shopping for ingredients, so I think it's time to do another crumble!

Rhubarb and Apple Crumble
Ingredients
For the filling
  • 300g Rhubarb
  • 300g Apples
  • 125g Caster sugar
  • ~1tsp Ground cinnamon
  • ~1tsp Ground ginger
  • ~1/2 tsp Ground nutmeg
  • A decent slug of cherry brandy
For the topping
  • 120g Butter
  • 200g Plain flour
  • 25g Caster sugar
Method
  1. Chop the rhubarb into ~20mm chunks.
  2. Core and dice the apples.
  3. Grease an ovenproof dish and pour the rhubarb and apple chunks into it.
  4. Sprinkle the sugar, cinnamon, ginger, nutmeg and cherry brandy over the fruit.
  5. Rub the butter and flour together until it resembles coarse breadcrumbs.
  6. Heap the topping over the fruit layer.
  7. Sprinkle the sugar over the top.
  8. Bake at 180C for ~45-60 mins until golden.
Okay, it's just fruit in a bowl, but don't the colours look amazing?!I think I've made the same mistake I always make with crumbles - mixing the flour and butter together too thoroughly. We shall see...Looks good!

Monday, 7 November 2011

It's like Fight Club, only with pastry instead of blood and sugar instead of violence

There's a small group of us who normally dine together in the Balliol SCR on a Monday evening. A few weeks ago, Bob and I had rather a nice idea; an SCR baking club. I have no idea if it'll actually get off the ground, but I thought that even if it doesn't, it'd be quite a nice one-off. I'm baking another Upside-down Tarte Tatin. It's almost exactly the same recipe as last time around. This time, I'm using Royal Gala apples instead of Braeburns, because they were on special offer, and I didn't have any lemon juice, so I threw in a little splash of cider vinegar to give it the acidity. I also chucked in a bit of cinnamon, because I'm firmly of the opinion that you can't go wrong with apples and cinnamon!

Looks pretty gorgeous, doesn't it?